Categories
ASP.NET Core

Populating Dropdown using Dependency Injection into View in ASP.NET Core

This blog explains how to load a drop-down list in View using a dependency injection, without passing the value from the controller. So that it will reduce the request to the controller. Let us see how to achieve this.

In this blog I have explained two types of drop-down list loading methods. The first one is a list of classes,  the second one is a list of strings. The following are Metals and OptionServices classes. The OptionServices provide a list of colors and a list of metal information (metal name and symbol)

 public class Metals
 {
  public string MetalName { get; set; }
  public string Symbol { get; set; }
 }

 public class OptionServices
 {
  public List<Metals> ListMetals()
  {
    return new List<Metals>()
    {
     new Metals(){ MetalName= “Gold”, Symbol=”Au” },
     new Metals(){ MetalName= “Platinum”, Symbol=”Pt” },
     new Metals(){ MetalName= “Silver”, Symbol=”Ag” }
    };
  }

  public List<string> ListColors()
  {
    return new List<string>() { “Red”, “Blue”, “Green”, “Yellow”, “Violet” };
  }
 }

To use the service, you must register the service in the ConfigureServices  method in the Startup.cs file.

public void ConfigureServices(IServiceCollection services)
{
    services.AddTransient<OptionServices>();
    services.AddControllersWithViews();
}

The one below is the view code. Here I have injected the OptionServices  into view and loaded it into the dropdown list

PopulateDropDown.cshtml

@using SampleMVCWebApplication.Services
@inject OptionServices  Options

<h4>Populate Drop Down List</h4>

Select a Metal: @Html.DropDownList(“metal”, Options.ListMetals().Select(c => new SelectListItem() { Text = c.MetalName, Value = c.Symbol }))

<br />
<br />

Select a Color: @Html.DropDownList(“color”, Options.ListColors().Select(c => new SelectListItem() { Text = c, Value = c }))

The following is a controller code. We do not need to pass any values here to load the drop-down list

public class HomeController : Controller
{
    public IActionResult PopulateDropDown()
    {
        return View();
    }
}

The following is an output of the above code.

Populating-Dropdown

This article explains how to load the dropdown using service with a small example.

If you have any questions about this please leave a comment below.

Categories
ASP.NET Core

Cache Tag Helper in ASP.NET Core

ASP.NET Core has a lot of built-in Tag Helper. The Cache Tag Helper is one of them. It helps to improve the application performance by storing the content in cache. In the ASP.NET core, content placed inside the <cache> tag is stored in the cache. For the First time the content is fetched from the server. The subsequent request will display from the cache until the cache duration expires. The default cache duration is 20 minutes.

The following is a sample of the Cache Tag Helper. This code page will display the current date and time two times. First date and time is a normal one. The second one is a cached date and time, which means that date and time are placed inside the CacheTag Helper.

@{
    ViewData[“Title”] = “Cache Tag Helper”;
    Layout = null;
}

 <h4>Cache Tag Helper</h4>

<div>The Current Time: <b>@DateTime.Now</b> </div>
<br />
<div>
    <cache>The Cache Tag Helper: <b>@DateTime.Now</b></cache>
</div>

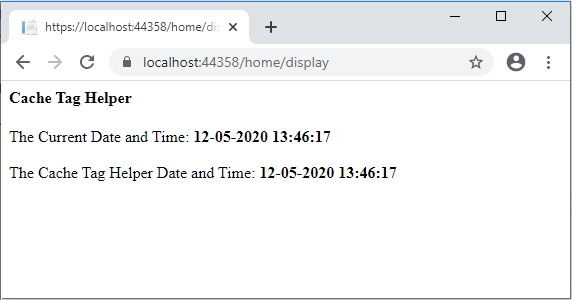
The following screenshot shows two dates and time, both are the same because the first request always fetches from the server.

cache tag helper 1

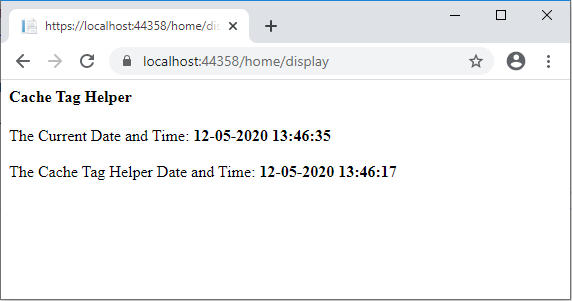
The second screenshot is taken after refreshing the page. Here only the first date and time has been changed, the second date and time shows the same date and time, because it was from the cache and not from the server.

cache tag helper 2

Cache Tag Helper Attributes:

enabled:

This attribute helps to enable or disable the cache content within the Cache Tag Helper. If it is true, it will provide the content in cache. If it is false it will not store the content. The default value is true.

<cache enabled=”true”>
The Cache Tag Helper Date and Time: <b>@DateTime.Now</b>
</cache>

expires-on:

This attribute helps to set an expiration date and  time. The syntax is @new DateTime(<year>,<month>,<date>,<hour>,<minute>,<second>) for example, expires-on=”@new DateTime(2025,5,11,18,19,0)”. This will expire on May 11th 2025 at 6:19 PM

<cache  expires-on=”@new DateTime(2025,5,11,18,19,0)”>
The Cache Tag Helper Date and Time: <b>@DateTime.Now</b>
</cache>

expires-after:

It helps to set a duration time from the first request. For example, an expires-after  value is @TimeSpan.FromSeconds(120) then it will store the cache content 120 seconds from the first requested time. The default value is 20 seconds.

<cache  expires-after=”@TimeSpan.FromSeconds(120)”>
The Cache Tag Helper Date and Time: <b>@DateTime.Now</b>
</cache>

expires-sliding:

It will expire the cache content if it has not accessed it at a particular time. If expires-sliding is 120 seconds @TimeSpan.FromSeconds(120), The page will give the same content if it is refreshed within 120 seconds. If the page is not refreshed for more than 120 minutes, it will expire the cache content and request new content from the web server.

<cache  expires-sliding=”@TimeSpan.FromSeconds(120)”>
The Cache Tag Helper Date and Time: <b>@DateTime.Now</b>
</cache>

Note

If the attribute name starts with expires-*, that attribute expires cache content

vary-by-header:

When setting the vary-by-header, it will update the cache when the header value changes.  vary-by-header=”User-Agent”. This will provide cache content based on the user agent (browser).

<cache  vary-by-header=”User-Agent”>
The Cache Tag Helper Date and Time: <b>@DateTime.Now</b>
</cache>

vary-by-query:

This stores the cache based on the value in the query string. Use commas when specifying multiple values. For example, vary-by-query=”id,name”. It will store the cache based on the id and name value of the query string. If any of the query string value is changed, it will fetch content from the source server instead of cache.

<cache  vary-by-query=”id,name”>
The Cache Tag Helper Date and Time: <b>@DateTime.Now</b>
</cache>

vary-by-route:

This saves the cache based on the value route values. It only sends a request when the route value changes. Use a comma separator to store cache based on multiple route values. If var-by-route = “id”, the cache content will vary based on the route id value.

<cache  vary-by-route=”id”>
The Cache Tag Helper Date and Time: <b>@DateTime.Now</b>
</cache>

vary-by-cookie:

It stores the cache based on the cookie value. A comma separator is used to specify multiple cookie values. If the cookie value changes, it will update the cache with new content.

<cache  vary-by-cookie=”.AspNetCore.Identity.Application”>
The Cache Tag Helper Date and Time: <b>@DateTime.Now</b>
</cache>

vary-by-user:

It stores the cache based on the logged in user. It accepts boolean values true or false. So it determines whether or not to save the cache value.

<cache  vary-by-user=”true”>
The Cache Tag Helper Date and Time: <b>@DateTime.Now</b>
</cache>

vary-by:

This attribute lets you store cache values based on any string values. The vary-by attribute may be any string value.  In the blow example vary-by=”@Model” so the cache will refresh the content based on the @Model value.

<cache  vary-by=”@Model”>
The Cache Tag Helper Date and Time: <b>@DateTime.Now</b>
</cache>

priority:

It helps to provide guidance to the cache provider. High, Low, NeverRemove, Normal are the list of priority attributes. The time of the cache memory problem, the cache provider will remove the low priority cache. The priority attribute is only a suggestion. If the priority attribute value is ‘NeverRemove’ it doesn’t mean it will never expire or be removed.

<cache  priority=”High”>
The Cache Tag Helper Date and Time: <b>@DateTime.Now</b>
</cache>

This article explains what a cache tag helper is, how it works, and what different attributes it contains.

If you have any questions, please leave a comment below.

Categories
ASP.NET Core

Model Binding in ASP.NET Core

In the ASP.NET core, the razor page uses the HTTP request data. The model binding helps to get the data from various sources. It converts string data to .NET data type and provides it to controller and razor pages. Previously, the developer should extract the contents from the HTTP request and manually assign the value to the properties. But the model binding simplifies the work. It automatically binds the browser data to the controller action parameter.

How Model Binding Works

Consider the following controller action. The action method Contact has two parameters ID and name. The ID parameter is an integer and, the name parameter is a string.

[HttpGet]
public ActionResult Contact(int ID, string name)
{
——
return View();
}

Imagining the HTTP request is ~/Contact?id=5&name=harry. The above Contact action method will bind the value 5 to the ID parameter and, harry to name parameter. First, the model binding will find the first parameter of the contact method, in this scenario, an integer ID. Then it will check the request and find the value for the parameter. The ID parameter in the request is a string.

So the model binding will convert the string ID 5 to an integer. Then it will check for the next parameter name and find the value harry, as it is a string it will bind the value to the parameter. Here the binding is not case sensitive. So the action parameter can be mentioned as ID or id. The model binder will bind the null value to the parameter if there is no value for the parameter. For example, if the HTTP request is ~/Contact?id=5 then it will pass the null value to the name parameter. But imagine, the request is ~/Contact?name=harry then it will throw an error message. Because an integer parameter cannot be Null.

What is [BindProperty] attribute?

A BindProperty attribute can be applied to the public property of the controller or page model. When you apply this attribute, it will create a model binding to the property.

public class HomeController : Controller
{
[BindProperty]
public string Name { get; set; }
[BindProperty]
public string Age { get; set; }


}

The above one is an example of [BindProperty] attribute. The [BindProperty] applied to the public properties Name and Age. So it is a direction to the binding framework to bind the corresponding properties.

Also, you can use the [BindProperty] for complex type as shown below.

[BindProperty]
public Customer Customer { get; set; }

[BindProperty] properties

There are two properties available in [BindProperty] attribute, Name and SupportsGet. Usually, the model binding will connect the field names with the property. If the property does not match with any of the field names, then the property will not bind with any value. For example, the HTTP request is ~/Contact?usrID=5&name=harry, then the model binding will never bind the usrID value to ID property. In this case, the Name property helps to bind the value. The following is an example of how to bind the usrID value to ID property.

[BindProperty(Name =”usrID”)]
public string ID { get; set; }

By default, the model binding will work for the POST request. The SupportsGet property helps to bind the GET requests.

[BindProperty(SupportsGet = true)]

[BindProperties] attribute

The [BindProperties] attribute is available in ASP.NET core 2.1 and later. You can apply this attribute to the controller or page model class. So the model binding will bind all the public properties in the class.

[BindProperties]
public class ModelBindingModel : PageModel
{


}

From the above article, you can acquire knowledge about what is model binding in ASP.NET MVC, how it binds the request to a controller action, how it reduces the work of developers, what is [bindProperty] attributes and how to use the attribute with public properties. If you have any questions, please leave a comment.

Categories
Technology

Static Image in Blazor – Inside and Outside Web Root

This article explains how to display a static image in the Blazor component. In ASP.NET Core  static files are served by Microsoft.AspNetCore.StaticFiles middleware. First, let’s look at the general way to display the image in the Blazor component.

Inside the Web Root

To display a static image in the Blazor component, first, it must store the image in any folder under the wwwroot file. It can be accessed by the relative path. To serve a static image, you need to use the app.UseStaticFiles () method in the start.Configure file.

The following is the Blazor component code. Here the image is obtained from {applicationFolder} /wwwroot/Image/InsideWebRoot.png.

@page “/”
<h3> Display Image in Blazor</h3>
<div>
    <img  src=”/Image/InsideWebRoot.png”   />
</div>
@code {
}

Outside the Web Root

The static file can also be served outside the web root. Consider the following image, here the StaticFilesFolder/Image is created outside the wwwroot folder.

Static Image

To serve this, you first need to configure the UseStaticFiles () method in the Startup.cs file. In the following code, UseStaticFiles uses FileProvider to locate the static file. PhysicalFileProvider is used to access the physical path. The request path is set to “/staticFiles”, which is mapped to the static file.

public void  Configure(IApplicationBuilder  app, IWebHostEnvironment env)
{
    app.UseStaticFiles();
 
    app.UseStaticFiles( new StaticFileOptions
    {
FileProvider = new  PhysicalFileProvider(
       Path. Combine(Directory . GetCurrentDirectory(), “StaticFilesFolder” )),
RequestPath = “/StaticFiles”
    });
}

The following is the Blazor component code. The static image path in the img tag is assigned as “/StaticFiles/Image/OutsideWebRoot.png”. The /StaticFiles is a RequestPath that is configured in the startup.cs file. So the following code will show the static image that is outside the web root.

@page “/”
<h3> Display Image in Blazor</h3>
<div>
    <img  src=”/StaticFiles/Image/OutsideWebRoot.png”  />
</div>
@code {
}

This article explains how to display a static image in Blazor Component.

If you have questions, please leave a comment.

Categories
ASP.NET Core

Tag Helpers in ASP.NET Core

Tag Helpers introduced in ASP.Net Core helps to develop a cleaner and better readable HTML markup. The Tag Helper is much easier to read and maintain for those who can understand HTML. With Tag Helper, the designer can edit the razor code without the knowledge of C# razor syntax. The web designers can get an HTML-friendly development experience.

Tag Helpers are classes that manipulate HTML elements. It implements the ITagHelper interface. Therefore, it helps to create a view content using C# logic. There are many built-in Tag Helpers available in .NET for common applications. The developers can also build their own customized Tag Helpers.

Tag Helper Basic

Here new { @class =  “form – control”}  is an HTML Helper attribute. When typing bootstrap class name ‘form-control’ visual studio will not provide Intellisense support.

@Html.TextBoxFor(m => m.StudentName, new  { @class = “form – control”}

But in the Tag Helper, the IntelliSense will support in all the markup and developer can use all the attributes of HTML element like class, style, etc. The following example is the same code in Tag Helper. When typing ‘class=’ the IntelliSense will display all the class names.

<input asp-for=”StudentName class =”form-control” />

When you use the Tag Helper you can avoid @signs, lambdas, and other helpers

Input Tag Helper Example

Input Tag Helper helps to bind the model values to the razor view. The following is a syntax for Input Tag Helper.

<input asp-for =“<Expression Name>” />

The above syntax will generate the name and id HTML attributes using the asp-for attribute. The asp-for attribute is a model expression. Here, asp-for=’property’ is equal to m=>m.property in the HTML helper.

@
var studentName = “ Peter“; 
 <input asp-for =“@studentName  />

The above code will generate the following HTML:

<input type= “text” id= studentName  name=studentName  value= Peter />

Tag Helper scope

The @addTagHelper, @removeTagHelper and the ‘!’ controls the Tag Helper scope.

@addTagHelper

@addTagHelper *, Microsoft.AspNetCore.Mvc.TagHelpers

The @addTagHelper directive makes the Tag Helper available in the view. The default ASP.NET core projectView/Shared/_ViewImports.cshtml includes the @addTagHelper.

@removeTagHelper

@removeTagHelper    Microsoft.AspNetCore.Mvc.TagHelpers

The @removeTagHelper directive helps to remove the Tag Helper availability from the view.

Opting out of individual elements

It is possible to disable the Tag Helper for a particular HTML element using the opt-out character (!)

<!span  asp-validation-for=”Email” class =”text-danger”></!span>

By adding the opt-out character (!) in opening tag and closing tag, the Tag Helper will get disabled in the element.

The Appearance of Tag Helper

The developer can clearly identify the Tag Helpers code in the visual studio with a unique color code. For example, when typing label HTML element in the visual studio it will display the word label in brown color.

appearance of tag helper

When typing asp-for (Tag Helper attribute) immediately the code will change to bold purple color

Tag Helper attribute

Note

The visual studio theme is blue or light, and then it will change the Tag Helper font to purple. If it is a dark theme, then the font will change to bold teal.

This article briefs about the Tag Helper in ASP.NET core. ASP.NET core already has lots of built-in Tag Helper. However, developers can create their own custom Tag Helpers.

If you have questions, please leave your comments.

Categories
Technology

Cross-Origin Resource Sharing (CORS)

Cross-origin resource sharing (CORS) is a mechanism based on HTTP headers that permits restricted access to a resource with a different domain.

The browser restricts the web page of different origin, this mechanism is called same origin policy. For example, https://www.demo.com/abc.html and https://www.demo.com/xyz.html these two urls are of the same origin. Consider the following urls:

  • http://www.demo.com – Different scheme: In this URL you can see that the protocol is ‘http://’ not ‘https://’. The ‘s’ (secure) is missing. 
  • https://www.demo.com:1234/abc.html – Different port number. The port number is a communication endpoint. In this URL the port no is 1234.

These kinds of different origins are blocked by browser security.

But sometimes the web page has to request some of the resources from different origins. In such cases you can use the Cross Origin Resource Sharing (CORS) as it allows the server to relax the same origin policy. 

Same Origin Policy

The same origin policy will restrict the website interacting with the resource from different domains.It helps prevent personal data from being stolen from one website to another.

How CORS Works

To make CORS Work you will have to add the new HTTP header that describes which origins allow you to read the information. To enable the CORS on the server, you have to add an additional header (Access-Control-Allow-Origin) to whitelist the urls. 

For example, if your API server is hosted in https://api.demo.com/customer and the CORS is configured in it, when you access the API from https://www.sample.com webpage it will send a response with the following header:

Access-Control-Allow-Origin: https://www.sample.com

The following image illustrates how CORS works. The client sends the request to the server API and the server API sends back the response with the header Access-Control-Allow-Origin: https://www.sample.com

Cross-Origin Resource Sharing

Also, you can use wildcard character(*), which means that the resource can be accessed by any origin.

Access-Control-Allow-Origin: *

Preflight Request

The preflight request is a small request sent by  the browser before the original request.  This will give the server an idea about the actual request.The server will then announce whether or not to send a request to the browser. The preflight request contains metadata about the HTTP method and additional request header. The server inspects the metadata and decides whether or not to send the request.

CORS

Note:

If the CORS policy is not properly configured, then it  leads to cross-domain based attacks.