
Route Templates in ASP.NET CORE Blazor
The term routing in Blazor is moving or navigating between the Blazor components. The Blazor provides a client-site routing mode. In this blog, let us see what is Route Templates in ASP.NET CORE Blazor.
In the Blazor application, the Router component is present inside the App.razor file.
The following is a default Router Component.
The Router component will provide the route data to the RouteView from the current navigation site. When matching is found for the requested route, the RouteView Component will populate the specified component inside the layout. If the requested route is not found, then the NotFound component will populate the content. From the above code it will display “Sorry, there’s nothing at this address.” message. Also, the user can customize the content for their needs.
Route Template
The Route Template is defined by adding the @page directive at the top of the component. @page directive will convert into RouteAttribute at the time of compiling the code. In the below snippet, the @page directive added as @page “/”. So when accessing a URL, say https://www.domainname.com/ it will display the component
https://www.domainname.com/index URL will display the below component.
Multiple Route
A single component may have multiple route templates. Consider the following component. Here, two different @page directives are stacked in the file. So it will provide multiple routes to the same component.
https://www.domainname.com/BlazorRoute and https://www.domainname.com/AnotherBlazorRoute both URLs will display the same above component
Route parameters
In the above code snippet, two @page directives are added. The first directive is to navigate without parameter and the second one is to navigate with parameter. The parameter is defined with curly brackets. [Parameter] attribute has been added to the ParameterText property variable to denote it as a component parameter.
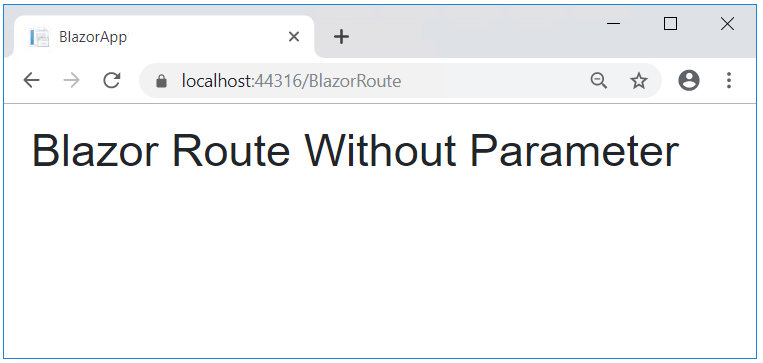
https://localhost:44316/BlazorRoute/ will give the following output:
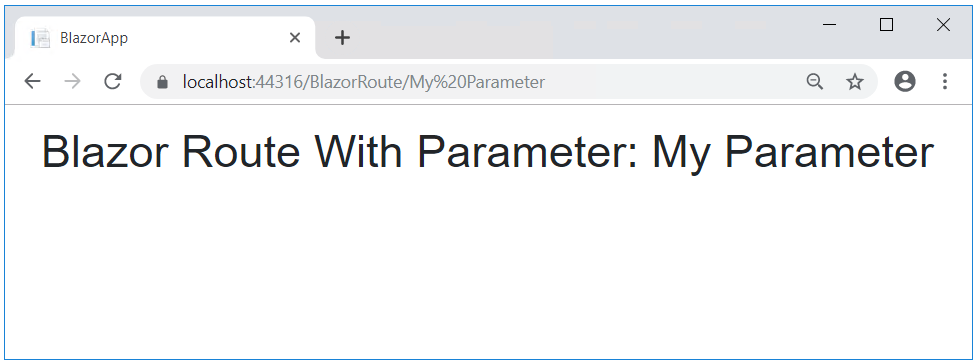
https://localhost:44316/BlazorRoute/My%20Parameter this URL will provide the following output.
Route constraints
The above code snippet illustrates how to pass multiple parameters and route constraints. The ID parameter solely accepts the integer value[{ID:int}]. And the TextParameter will accept the string value. The following image is an output of the above code. https://localhost:44316/BlazorRoute/5/my%20parameter
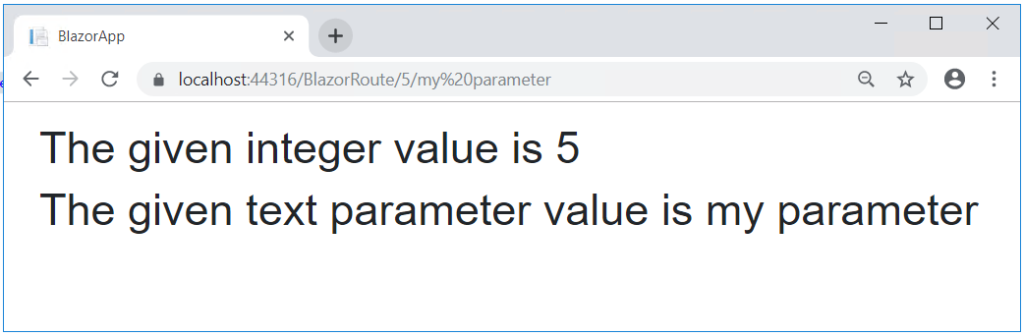
The user needs to pass both ID and TextParameter parameters otherwise the output will show the message with the NotFound Component.
If you have any questions, please leave a comment.