Categories
ASP.NET Core

ASP.NET Core Service Scope

Singleton vs Scoped vs Transient

This article describes the service scope in ASP.NET Core and the difference between AddSingleton, AddScoped and AddTransient  methods. Let us see the following example that shows the lifetime of the services

The following is an interface. This interface only returns a string unique ID (GuidID).

IRepository.cs

public interface IRepository
{
   string GetUniqueID();
}

The below code is an implementation of the above interface. It has a constructor MyRepository which creates a unique ID when the object is created. The final one is GetUniqueID() which returns the unique ID.

MyRepository.cs

public class MyRepository : IRepository
{
    private string uniqueID;

    public MyRepository()
    {
        uniqueID = Guid.NewGuid().ToString();
    }

    public string GetUniqueID()
    {
        return uniqueID;
    }
}

AddSingleton

AddSingleton will generate an instance when requested for the first time. Then it will use the same instance for further request.

To use the service first, you must register with the ConfigureService method in Startup.cs. This ConfigureServices method enables you to add services to the application. Here I have added AddSingleton service with Service Type IRepository and implementation MyRepository

Startup.cs

public void ConfigureServices(IServiceCollection services)
 {
     services.AddSingleton<IRepository, MyRepository>();
     services.AddControllersWithViews();
 }

The following is a HomeController code. Here the IRepository service is injected in HomeController construction. In the Index action method uniqueID is received from GetUniqueID() method and assigned to ViewData[“UniqueID”]

HomeController.cs

public class HomeController : Controller
    {
        public IRepository _myRepository { get; set; }

        public HomeController(IRepository myRepository)
        {
            _myRepository = myRepository;
        }

        public IActionResult Index()
        {
            string uniqueID = _myRepository.GetUniqueID();
            ViewData[“UniqueID”] = uniqueID;
            return View();
        }
    }

The following is an Index view code. The unique ID in ViewData [“UniqueID”] is shown here and a partial view named UniquePartialView has been added to the view.

Index.cshtml

@{
    Layout = null;
    ViewData[“Title”] = “ASP.NET Core Service Scope”;
}

<h4>ASP.NET Core Service Scope</h4>

The Unique Value: @ViewData[“UniqueID”]

<br />
<br />

<partial name=”UniquePartialView”>

Next is a partial view code. The service is injected using @Inject directive and the unique ID is shown.

UniquePartialView.cshtml

@inject IRepository repository

PartialView ID: @repository.GetUniqueID()

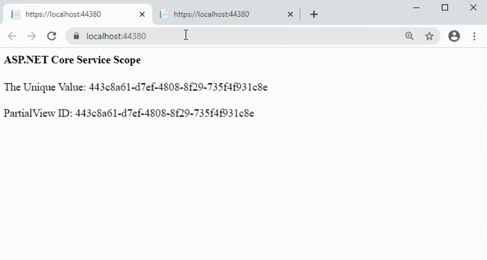
The following is an output of the singleton. The unique ID here is the same for the parent view and the child view. Also, if you access the same page in the new browser, it will show the same unique ID. Even if you refresh the page it does not change the unique ID.

AddSingleton


AddScoped

For Scoped, an instance will be created per client request. The following is a ConfigureServices in the Startup.cs. Here I have registered the AddScoped for the above example Paragraph

Startup.cs

public void ConfigureServices(IServiceCollection services)
{
    services.AddScoped<IRepository, MyRepository>();
    services.AddControllersWithViews();
}

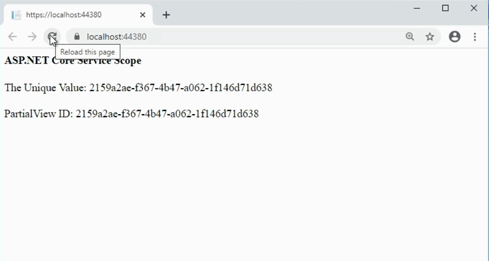
The following is an output of AddScoped.  The unique ID here is the same for the parent view and partial view. But the unique ID will change when you refresh the page. This means it will create a new instance for each request.

AddScoped

AddTransient

For Transient, the instance will be created for each request.  To test AddTransient’s lifetime, I have registered the AddTransient in ConfigureServices method in Startup.cs.

public void ConfigureServices(IServiceCollection services)
{
    services.AddTransient<IRepository, MyRepository>();
    services.AddControllersWithViews();
}

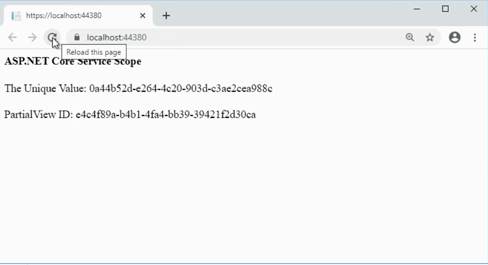
The following is an output of AddTransient.  The unique ID here is different for the parent view and partial view. When refreshing the page, it brings up different unique IDs for parent and child view.

AddTransient

This blog explains what is the lifetime for the service and the difference between AddSingleton, AddScoped and AddTransient.

If you have any questions, please leave a comment below.

Categories
ASP.NET Core

Service Injection into View in ASP.NET Core

This blog is about how dependency is injected directly into view. Let us look at it using a small example.

The following is a ColorListService class that returns a list of strings.

Note

Put all your services in a separate folder called Services. So this will help you maintain a project structure

ColorListService.cs

public class ColorListService
{
    public List<string> GetColors()
    {
        return new List<string>() { “Red”, “Blue”, “Green”, “Yellow”, “Violet” };
    }
}

Before you can use a service, you must register for the service. See ASP.NET Service Scope for more information

Startup.cs

public void ConfigureServices(IServiceCollection services)
{
    services.AddTransient<ColorListService>();
    services.AddControllersWithViews();
}

The following is a view code. Here the ColorListService is injected using @Inject Directive. Finally a list of colors is listed using foreach.

ServiceDemo.cshtml

@{
    Layout = null;
    ViewData[“Title”] = “Service Injection into View”;
}

@inject SampleMVCApplication.Services.ColorListService  colors

<h4>Service Injection into View in ASP.NET Core</h4>

@foreach (string item in colors.GetColors())
{
    <div>@item</div>
}

Below is a HomeController code. It has a ServiceDemo() action which will render a ServiceDemo view.

HomeController.cs

public class HomeController : Controller
{
    public IActionResult ServiceDemo()
    {
         return View();
    }
}

The following is the output of the above code

Service Injection into View

This blog explains how to inject the service directly into the view with a small example.

If you have any questions, please leave a comment below.

Categories
ASP.NET Core

Group DropDownList Options in ASP.NET Core

This blog explains how to group options in a DropDownList in ASP.NET Core. Let’s look at it with an example.

This example is going to bind the list of movie names grouped by the release year with the Selected Tag Helper.

The following is the MyViewModelSample class. It has two properties, SelectedMovieID and MoviesList. The SelectedMovieID property will have the selected value of the drop-down list. The MoviesListproperty is what sets up a list of movies.

MyViewModelSample.cs

using Microsoft.AspNetCore.Mvc.Rendering;
public class MyViewModelSample
{
    public int SelectedMovieID { get; set; }
    public List<SelectListItem> MoviesList { get; set; }
}

The following is a controller code. This controller has 2 action methods, Sample() and SampleSubmit(). In the Sample() action method, values are assigned and passed to the view. In SampleSubmit() action method, the selected movie ID is retrieved from the view and passed to another view to be displayed on the page.

HomeController.cs

using Microsoft.AspNetCore.Mvc.Rendering;
public IActionResult Sample()
{
        var vm = new MyViewModelSample();

        var group2018 = new SelectListGroup { Name = “2018” };
        var group2019 = new SelectListGroup { Name = “2019” };

        var movieList = new List<SelectListItem>()
        {
            new SelectListItem() { Value = “1”, Text = “Incredibles 2”, Group = group2018 },
            new SelectListItem() { Value = “2”, Text = “Ralph Breaks the Internet”, Group = group2018 },
            new SelectListItem() { Value = “3”, Text = “Aladdin”, Group = group2019 },
            new SelectListItem() { Value = “4”, Text = “The Lion King”, Group = group2019 },
            new SelectListItem() { Value = “5”, Text = “Frozen II”, Group = group2019 }
        };
        vm.MoviesList = movieList;
        return View(vm);
}

[HttpPost]
public IActionResult SampleSubmit(MyViewModelSample vm)
{
    return View(“SampleResult”, vm.SelectedMovieID);
}

The following is a sample view. @Model.MoviesList is assigned to asp-items to bind a list of movie names. The SelectedMovieID property is assigned to the asp-for, thus providing the selected result.

Sample.cshtml

@{
    Layout = null;
}

@model MyViewModelSample

 <h4>Group DropDownList Options in ASP.NET Core</h4>

<form asp-controller=”Home” asp-action=”SampleSubmit” method=”post”>
      <select asp-items=”@Model.MoviesList” asp-for=”SelectedMovieID”></select>
      <input type=”submit” value=”submit” />
</form>

Below is a result view. The selected move ID will be displayed here.

SampleResult.cshtml

@{
    Layout = null;
}

@model int

<h4>Group DropDownList Options in ASP.NET Core</h4>
<div> The selected movie ID: @Model</div>

The following image is the output of the code above. Here you can see the names of the movies grouped by the movie release year. When the page is submitted it returns the selected movie ID.

Group DropDownList Options

If you have any questions, please leave a comment below.

Categories
ASP.NET Core

Populating Dropdown using Dependency Injection into View in ASP.NET Core

This blog explains how to load a drop-down list in View using a dependency injection, without passing the value from the controller. So that it will reduce the request to the controller. Let us see how to achieve this.

In this blog I have explained two types of drop-down list loading methods. The first one is a list of classes,  the second one is a list of strings. The following are Metals and OptionServices classes. The OptionServices provide a list of colors and a list of metal information (metal name and symbol)

 public class Metals
 {
  public string MetalName { get; set; }
  public string Symbol { get; set; }
 }

 public class OptionServices
 {
  public List<Metals> ListMetals()
  {
    return new List<Metals>()
    {
     new Metals(){ MetalName= “Gold”, Symbol=”Au” },
     new Metals(){ MetalName= “Platinum”, Symbol=”Pt” },
     new Metals(){ MetalName= “Silver”, Symbol=”Ag” }
    };
  }

  public List<string> ListColors()
  {
    return new List<string>() { “Red”, “Blue”, “Green”, “Yellow”, “Violet” };
  }
 }

To use the service, you must register the service in the ConfigureServices  method in the Startup.cs file.

public void ConfigureServices(IServiceCollection services)
{
    services.AddTransient<OptionServices>();
    services.AddControllersWithViews();
}

The one below is the view code. Here I have injected the OptionServices  into view and loaded it into the dropdown list

PopulateDropDown.cshtml

@using SampleMVCWebApplication.Services
@inject OptionServices  Options

<h4>Populate Drop Down List</h4>

Select a Metal: @Html.DropDownList(“metal”, Options.ListMetals().Select(c => new SelectListItem() { Text = c.MetalName, Value = c.Symbol }))

<br />
<br />

Select a Color: @Html.DropDownList(“color”, Options.ListColors().Select(c => new SelectListItem() { Text = c, Value = c }))

The following is a controller code. We do not need to pass any values here to load the drop-down list

public class HomeController : Controller
{
    public IActionResult PopulateDropDown()
    {
        return View();
    }
}

The following is an output of the above code.

Populating-Dropdown

This article explains how to load the dropdown using service with a small example.

If you have any questions about this please leave a comment below.

Categories
ASP.NET Core

Cache Tag Helper in ASP.NET Core

ASP.NET Core has a lot of built-in Tag Helper. The Cache Tag Helper is one of them. It helps to improve the application performance by storing the content in cache. In the ASP.NET core, content placed inside the <cache> tag is stored in the cache. For the First time the content is fetched from the server. The subsequent request will display from the cache until the cache duration expires. The default cache duration is 20 minutes.

The following is a sample of the Cache Tag Helper. This code page will display the current date and time two times. First date and time is a normal one. The second one is a cached date and time, which means that date and time are placed inside the CacheTag Helper.

@{
    ViewData[“Title”] = “Cache Tag Helper”;
    Layout = null;
}

 <h4>Cache Tag Helper</h4>

<div>The Current Time: <b>@DateTime.Now</b> </div>
<br />
<div>
    <cache>The Cache Tag Helper: <b>@DateTime.Now</b></cache>
</div>

The following screenshot shows two dates and time, both are the same because the first request always fetches from the server.

cache tag helper 1

The second screenshot is taken after refreshing the page. Here only the first date and time has been changed, the second date and time shows the same date and time, because it was from the cache and not from the server.

cache tag helper 2

Cache Tag Helper Attributes:

enabled:

This attribute helps to enable or disable the cache content within the Cache Tag Helper. If it is true, it will provide the content in cache. If it is false it will not store the content. The default value is true.

<cache enabled=”true”>
The Cache Tag Helper Date and Time: <b>@DateTime.Now</b>
</cache>

expires-on:

This attribute helps to set an expiration date and  time. The syntax is @new DateTime(<year>,<month>,<date>,<hour>,<minute>,<second>) for example, expires-on=”@new DateTime(2025,5,11,18,19,0)”. This will expire on May 11th 2025 at 6:19 PM

<cache  expires-on=”@new DateTime(2025,5,11,18,19,0)”>
The Cache Tag Helper Date and Time: <b>@DateTime.Now</b>
</cache>

expires-after:

It helps to set a duration time from the first request. For example, an expires-after  value is @TimeSpan.FromSeconds(120) then it will store the cache content 120 seconds from the first requested time. The default value is 20 seconds.

<cache  expires-after=”@TimeSpan.FromSeconds(120)”>
The Cache Tag Helper Date and Time: <b>@DateTime.Now</b>
</cache>

expires-sliding:

It will expire the cache content if it has not accessed it at a particular time. If expires-sliding is 120 seconds @TimeSpan.FromSeconds(120), The page will give the same content if it is refreshed within 120 seconds. If the page is not refreshed for more than 120 minutes, it will expire the cache content and request new content from the web server.

<cache  expires-sliding=”@TimeSpan.FromSeconds(120)”>
The Cache Tag Helper Date and Time: <b>@DateTime.Now</b>
</cache>

Note

If the attribute name starts with expires-*, that attribute expires cache content

vary-by-header:

When setting the vary-by-header, it will update the cache when the header value changes.  vary-by-header=”User-Agent”. This will provide cache content based on the user agent (browser).

<cache  vary-by-header=”User-Agent”>
The Cache Tag Helper Date and Time: <b>@DateTime.Now</b>
</cache>

vary-by-query:

This stores the cache based on the value in the query string. Use commas when specifying multiple values. For example, vary-by-query=”id,name”. It will store the cache based on the id and name value of the query string. If any of the query string value is changed, it will fetch content from the source server instead of cache.

<cache  vary-by-query=”id,name”>
The Cache Tag Helper Date and Time: <b>@DateTime.Now</b>
</cache>

vary-by-route:

This saves the cache based on the value route values. It only sends a request when the route value changes. Use a comma separator to store cache based on multiple route values. If var-by-route = “id”, the cache content will vary based on the route id value.

<cache  vary-by-route=”id”>
The Cache Tag Helper Date and Time: <b>@DateTime.Now</b>
</cache>

vary-by-cookie:

It stores the cache based on the cookie value. A comma separator is used to specify multiple cookie values. If the cookie value changes, it will update the cache with new content.

<cache  vary-by-cookie=”.AspNetCore.Identity.Application”>
The Cache Tag Helper Date and Time: <b>@DateTime.Now</b>
</cache>

vary-by-user:

It stores the cache based on the logged in user. It accepts boolean values true or false. So it determines whether or not to save the cache value.

<cache  vary-by-user=”true”>
The Cache Tag Helper Date and Time: <b>@DateTime.Now</b>
</cache>

vary-by:

This attribute lets you store cache values based on any string values. The vary-by attribute may be any string value.  In the blow example vary-by=”@Model” so the cache will refresh the content based on the @Model value.

<cache  vary-by=”@Model”>
The Cache Tag Helper Date and Time: <b>@DateTime.Now</b>
</cache>

priority:

It helps to provide guidance to the cache provider. High, Low, NeverRemove, Normal are the list of priority attributes. The time of the cache memory problem, the cache provider will remove the low priority cache. The priority attribute is only a suggestion. If the priority attribute value is ‘NeverRemove’ it doesn’t mean it will never expire or be removed.

<cache  priority=”High”>
The Cache Tag Helper Date and Time: <b>@DateTime.Now</b>
</cache>

This article explains what a cache tag helper is, how it works, and what different attributes it contains.

If you have any questions, please leave a comment below.

Categories
ASP.NET Core

Model Binding in ASP.NET Core

In the ASP.NET core, the razor page uses the HTTP request data. The model binding helps to get the data from various sources. It converts string data to .NET data type and provides it to controller and razor pages. Previously, the developer should extract the contents from the HTTP request and manually assign the value to the properties. But the model binding simplifies the work. It automatically binds the browser data to the controller action parameter.

How Model Binding Works

Consider the following controller action. The action method Contact has two parameters ID and name. The ID parameter is an integer and, the name parameter is a string.

[HttpGet]
public ActionResult Contact(int ID, string name)
{
——
return View();
}

Imagining the HTTP request is ~/Contact?id=5&name=harry. The above Contact action method will bind the value 5 to the ID parameter and, harry to name parameter. First, the model binding will find the first parameter of the contact method, in this scenario, an integer ID. Then it will check the request and find the value for the parameter. The ID parameter in the request is a string.

So the model binding will convert the string ID 5 to an integer. Then it will check for the next parameter name and find the value harry, as it is a string it will bind the value to the parameter. Here the binding is not case sensitive. So the action parameter can be mentioned as ID or id. The model binder will bind the null value to the parameter if there is no value for the parameter. For example, if the HTTP request is ~/Contact?id=5 then it will pass the null value to the name parameter. But imagine, the request is ~/Contact?name=harry then it will throw an error message. Because an integer parameter cannot be Null.

What is [BindProperty] attribute?

A BindProperty attribute can be applied to the public property of the controller or page model. When you apply this attribute, it will create a model binding to the property.

public class HomeController : Controller
{
[BindProperty]
public string Name { get; set; }
[BindProperty]
public string Age { get; set; }


}

The above one is an example of [BindProperty] attribute. The [BindProperty] applied to the public properties Name and Age. So it is a direction to the binding framework to bind the corresponding properties.

Also, you can use the [BindProperty] for complex type as shown below.

[BindProperty]
public Customer Customer { get; set; }

[BindProperty] properties

There are two properties available in [BindProperty] attribute, Name and SupportsGet. Usually, the model binding will connect the field names with the property. If the property does not match with any of the field names, then the property will not bind with any value. For example, the HTTP request is ~/Contact?usrID=5&name=harry, then the model binding will never bind the usrID value to ID property. In this case, the Name property helps to bind the value. The following is an example of how to bind the usrID value to ID property.

[BindProperty(Name =”usrID”)]
public string ID { get; set; }

By default, the model binding will work for the POST request. The SupportsGet property helps to bind the GET requests.

[BindProperty(SupportsGet = true)]

[BindProperties] attribute

The [BindProperties] attribute is available in ASP.NET core 2.1 and later. You can apply this attribute to the controller or page model class. So the model binding will bind all the public properties in the class.

[BindProperties]
public class ModelBindingModel : PageModel
{


}

From the above article, you can acquire knowledge about what is model binding in ASP.NET MVC, how it binds the request to a controller action, how it reduces the work of developers, what is [bindProperty] attributes and how to use the attribute with public properties. If you have any questions, please leave a comment.

Categories
ASP.NET Core

Tag Helpers in ASP.NET Core

Tag Helpers introduced in ASP.Net Core helps to develop a cleaner and better readable HTML markup. The Tag Helper is much easier to read and maintain for those who can understand HTML. With Tag Helper, the designer can edit the razor code without the knowledge of C# razor syntax. The web designers can get an HTML-friendly development experience.

Tag Helpers are classes that manipulate HTML elements. It implements the ITagHelper interface. Therefore, it helps to create a view content using C# logic. There are many built-in Tag Helpers available in .NET for common applications. The developers can also build their own customized Tag Helpers.

Tag Helper Basic

Here new { @class =  “form – control”}  is an HTML Helper attribute. When typing bootstrap class name ‘form-control’ visual studio will not provide Intellisense support.

@Html.TextBoxFor(m => m.StudentName, new  { @class = “form – control”}

But in the Tag Helper, the IntelliSense will support in all the markup and developer can use all the attributes of HTML element like class, style, etc. The following example is the same code in Tag Helper. When typing ‘class=’ the IntelliSense will display all the class names.

<input asp-for=”StudentName class =”form-control” />

When you use the Tag Helper you can avoid @signs, lambdas, and other helpers

Input Tag Helper Example

Input Tag Helper helps to bind the model values to the razor view. The following is a syntax for Input Tag Helper.

<input asp-for =“<Expression Name>” />

The above syntax will generate the name and id HTML attributes using the asp-for attribute. The asp-for attribute is a model expression. Here, asp-for=’property’ is equal to m=>m.property in the HTML helper.

@
var studentName = “ Peter“; 
 <input asp-for =“@studentName  />

The above code will generate the following HTML:

<input type= “text” id= studentName  name=studentName  value= Peter />

Tag Helper scope

The @addTagHelper, @removeTagHelper and the ‘!’ controls the Tag Helper scope.

@addTagHelper

@addTagHelper *, Microsoft.AspNetCore.Mvc.TagHelpers

The @addTagHelper directive makes the Tag Helper available in the view. The default ASP.NET core projectView/Shared/_ViewImports.cshtml includes the @addTagHelper.

@removeTagHelper

@removeTagHelper    Microsoft.AspNetCore.Mvc.TagHelpers

The @removeTagHelper directive helps to remove the Tag Helper availability from the view.

Opting out of individual elements

It is possible to disable the Tag Helper for a particular HTML element using the opt-out character (!)

<!span  asp-validation-for=”Email” class =”text-danger”></!span>

By adding the opt-out character (!) in opening tag and closing tag, the Tag Helper will get disabled in the element.

The Appearance of Tag Helper

The developer can clearly identify the Tag Helpers code in the visual studio with a unique color code. For example, when typing label HTML element in the visual studio it will display the word label in brown color.

appearance of tag helper

When typing asp-for (Tag Helper attribute) immediately the code will change to bold purple color

Tag Helper attribute

Note

The visual studio theme is blue or light, and then it will change the Tag Helper font to purple. If it is a dark theme, then the font will change to bold teal.

This article briefs about the Tag Helper in ASP.NET core. ASP.NET core already has lots of built-in Tag Helper. However, developers can create their own custom Tag Helpers.

If you have questions, please leave your comments.

Categories
Development

Tips for writing clean code in C#

This post will help you speed up your C# code and provide many tricks that every professional developer must know.

1. Validating input “first”

Look at the code snippet below

Validating input “first”

In this method we have many lines of code and we need to read all the code to find the last line that throws an exception if the argument is null. Instead, we can validate the input first. This tells the viewer of the code how a given method should be used.

The below code is rewritten with the reverse order of if and else statements.

reverse order of if and else statements

You can now quickly tell what is the valid argument for this method

2. “Else” is not always required

Let’s continue with the same previous example. If an employee is null we throw an exception and code does not continue to execute. So there is no need for an else block. Having an else block here only increases the indentation of the code. Here is a better way to write this code.

“Else” is not always required

3. Auto-property Initializers

One of the features added from C# 6 onward is a way to initialize properties directly like fields. We usually create constructors to initial properties like below.

Auto-property Initializers

Instead of the constructor used above we can directly initialize the property as shown below.

directly initialize the property

4. Null-conditional Operator

Many times we would have encountered the following type of coding for checking an object for null before accessing one of its members.

Null-conditional Operator

From C# 6 onwards we have a null-conditional operator (?) that evaluates null. If the object is null then the value null will be returned.

 value null

In the above example there are two null-conditional operators, one checks null in the employee object and another checks null in the address object present inside the employee. If any one is null then addressID will be set to null.

5. Null-coallescing operator

Continuing from above example, in case we do not want null value to be returned and want addressId to be an integer with default value ‘0’ when employee or address is null. We can use the null-coallescing operator (??) as shown below.

Null-coallescing operator

6. Expression Bodied Members

We can often encounter methods having single line return statement like below

Expression Bodied Members

Instead of above we can rewrite using expression bodied members, thus it reduces line indentation.

expression bodied members
Categories
Development

Field Service Application and its Advantages

Field Service Management refers to managing resources involved in the installation and servicing of equipment. In Field Service Management, Managers are under constant pressure to meet customer expectations, monitor the work done by service technicians and provide insightful data to management. Scheduling and dispatching service executives based on their availability is also cumbersome. Technicians / Service executives are also in need of tools to ease their work in the field. Getting the right information at the right time can improve their productivity. The service team requires access to real-time data to address customer queries and provide better service. Challenges faced by technicians on the field include lack of access to information about the customer and previous work order, delay in getting approval from supervisors, sending instant updates about the job status. This article briefs how a field service software accelerates business productivity.

What is Field Service Management Software?

Any Organization that deploys technicians to the client site can make use of Field Service Software. The software can assist your sales team to spend more time selling and have better communication with the customer. The application is conveniently installed on the technician’s mobile device. The application is integrated with back-office and technicians get access to customer history.

A field service application automates and manages end-to-end field service operations. The software aligns the service operation in line with your business goals. The software enables to effectively manage your workforce and schedule tasks.  A good field service application allows Managers and Supervisors to spend less time monitoring the service operations on the field.

The goal of any business is to provide better customer service. A field service software helps to achieve higher customer satisfaction and customer retention. The software helps in effective work order scheduling by quickly assigning tickets based on the technician’s skill set, availability and current location. It reduces the delay in addressing customer tickets. It also allows the rescheduling of tickets if the customer / technician is not available and reduces downtime. The software allows managing the inventory of equipment and spare parts used while servicing.

Customer Portal

The FSM application comes with a customer portal that can be installed on both Android and iOS devices. The portal allows customers to register a service request, view invoices, AMC and warranty details and make an online payment.

The FSM application is also integrated with call center operations allowing quick scheduling of tickets.

Advantages to the technicians

  • Effective work planning for the day
  • Assign tickets for the day
  • Access to information from anywhere
  • Improved communication between customer and technician
  • Get Reminders and notifications
  • Automates billing
  • Captures Digital Signature

Benefits to the Organization

  • Optimized task scheduling
  • Higher Return on Investment
  • Fully automated invoicing and billing
  • Real-time Analytics
  • Instant updates on the job status
  • Speedy Issue Resolution
  • Improved Customer Service
  • Effective scheduling of tickets
  • Reduces downtime /unproductive time
  • Easy Inventory Management
  • Dashboards and analytics
  • Reports on service team performance
  • Reports on Service History
  • Insights for better decision making
  • Integration with ERP

There are many FSM software available in the market. But one size doesn’t fit all. Finding the right field service application can be challenging.

If you are looking for a field service management software that can be customized for your business, contact us today.

Categories
Development

Custom Software or Off the Shelf – Decide what is right for you

Deciding between custom software and off the shelf software is a key business decision for any organization. Each option has its own merits and drawbacks. You have to weigh them carefully before deciding what is beneficial for your business.

Off the shelf

An Off the shelf (or bespoke) software refers to products that are readily available in the market. It comes handy and requires less set up time. They are designed for a broader audience so they will have numerous features all of which might not be useful to your business. The off the shelf product may not have certain functionalities that your business demands. Some vendors provide options to customize the product based on your requirements.

Pros

  • Quick set up – can be implemented straight away
  • Free trials – you can try them for free
  • Discussion forum – you can get answers from user forums for queries
  • Low upfront cost – initial set up cost is low
  • Regular upgrades available

Cons

  • License cost – you have to buy the product
  • High maintenance cost – upgrades, changes, and support comes with additional cost
  • Ownership – you don’t own the source code
  • Lacks Scalability – it is not easy to modify the product
  • Missing features – it may not have all elements required by your business
  • Compatibility issue – it might conflict with your current system

Custom software

Be it a shoe or a dress we all know one size doesn’t fit all. An off the shelf software might be readily available but it might not help your business plan in the long run. Custom software is designed exactly to match your requirements and overcomes the shortcomings of an off the shelf product. It might come with a higher initial cost but it requires no license and upgradation is easy as you own the source code.  Most of the custom applications are user-friendly as they don’t have redundant functionalities. A well-built custom application can be better than any commercial off the shelf product.

Pros

  • Tailor-made – customized for your business
  • Ownership – you get ownership of the product
  • Expandable – flexible, can scale up with changing needs of your business
  • Maintenance and support – easy to get technical assistance from the development team
  • Secured – security aspects of the application can be designed to your choice
  • Integration – easier to integrate with other systems
  • An advantage over your competitors who use same off the shelf product

Cons

  • Cost – Higher initial cost as it is done exclusively for you but has a long term gain
  • Time – It definitely takes time to build custom software.

The risk involved in building a custom software might be addressed by choosing an organization who has ample expertise in developing custom applications. Weighing the pros and cons and keeping your long term business goal in mind decide on the right option.

Get in touch with us for any questions you may have regarding custom software development.