ASP.NET Core has a lot of built-in Tag Helper. The Cache Tag Helper is one of them. It helps to improve the application performance by storing the content in cache. In the ASP.NET core, content placed inside the <cache> tag is stored in the cache. For the First time the content is fetched from the server. The subsequent request will display from the cache until the cache duration expires. The default cache duration is 20 minutes.
The following is a sample of the Cache Tag Helper. This code page will display the current date and time two times. First date and time is a normal one. The second one is a cached date and time, which means that date and time are placed inside the CacheTag Helper.
@{
ViewData[“Title”] = “Cache Tag Helper”;
Layout = null;
}
<h4>Cache Tag Helper</h4>
<div>The Current Time: <b>@DateTime.Now</b> </div>
<br />
<div>
<cache>The Cache Tag Helper: <b>@DateTime.Now</b></cache>
</div>
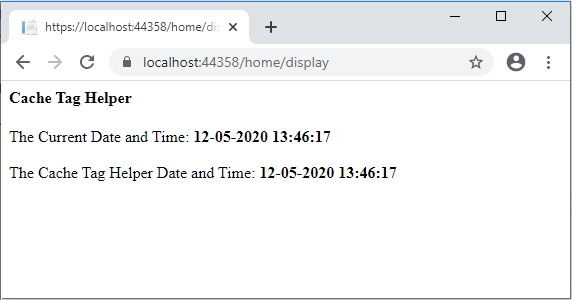
The following screenshot shows two dates and time, both are the same because the first request always fetches from the server.
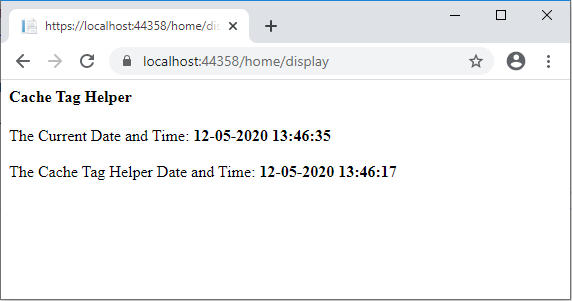
The second screenshot is taken after refreshing the page. Here only the first date and time has been changed, the second date and time shows the same date and time, because it was from the cache and not from the server.
Cache Tag Helper Attributes:
enabled:
This attribute helps to enable or disable the cache content within the Cache Tag Helper. If it is true, it will provide the content in cache. If it is false it will not store the content. The default value is true.
<cache enabled=”true”>
The Cache Tag Helper Date and Time: <b>@DateTime.Now</b>
</cache>
expires-on:
This attribute helps to set an expiration date and time. The syntax is @new DateTime(<year>,<month>,<date>,<hour>,<minute>,<second>) for example, expires-on=”@new DateTime(2025,5,11,18,19,0)”. This will expire on May 11th 2025 at 6:19 PM
<cache expires-on=”@new DateTime(2025,5,11,18,19,0)”>
The Cache Tag Helper Date and Time: <b>@DateTime.Now</b>
</cache>
expires-after:
It helps to set a duration time from the first request. For example, an expires-after value is @TimeSpan.FromSeconds(120) then it will store the cache content 120 seconds from the first requested time. The default value is 20 seconds.
<cache expires-after=”@TimeSpan.FromSeconds(120)”>
The Cache Tag Helper Date and Time: <b>@DateTime.Now</b>
</cache>
expires-sliding:
It will expire the cache content if it has not accessed it at a particular time. If expires-sliding is 120 seconds @TimeSpan.FromSeconds(120), The page will give the same content if it is refreshed within 120 seconds. If the page is not refreshed for more than 120 minutes, it will expire the cache content and request new content from the web server.
<cache expires-sliding=”@TimeSpan.FromSeconds(120)”>
The Cache Tag Helper Date and Time: <b>@DateTime.Now</b>
</cache>
Note
If the attribute name starts with expires-*, that attribute expires cache content
vary-by-header:
When setting the vary-by-header, it will update the cache when the header value changes. vary-by-header=”User-Agent”. This will provide cache content based on the user agent (browser).
<cache vary-by-header=”User-Agent”>
The Cache Tag Helper Date and Time: <b>@DateTime.Now</b>
</cache>
vary-by-query:
This stores the cache based on the value in the query string. Use commas when specifying multiple values. For example, vary-by-query=”id,name”. It will store the cache based on the id and name value of the query string. If any of the query string value is changed, it will fetch content from the source server instead of cache.
<cache vary-by-query=”id,name”>
The Cache Tag Helper Date and Time: <b>@DateTime.Now</b>
</cache>
vary-by-route:
This saves the cache based on the value route values. It only sends a request when the route value changes. Use a comma separator to store cache based on multiple route values. If var-by-route = “id”, the cache content will vary based on the route id value.
<cache vary-by-route=”id”>
The Cache Tag Helper Date and Time: <b>@DateTime.Now</b>
</cache>
vary-by-cookie:
It stores the cache based on the cookie value. A comma separator is used to specify multiple cookie values. If the cookie value changes, it will update the cache with new content.
<cache vary-by-cookie=”.AspNetCore.Identity.Application”>
The Cache Tag Helper Date and Time: <b>@DateTime.Now</b>
</cache>
vary-by-user:
It stores the cache based on the logged in user. It accepts boolean values true or false. So it determines whether or not to save the cache value.
<cache vary-by-user=”true”>
The Cache Tag Helper Date and Time: <b>@DateTime.Now</b>
</cache>
vary-by:
This attribute lets you store cache values based on any string values. The vary-by attribute may be any string value. In the blow example vary-by=”@Model” so the cache will refresh the content based on the @Model value.
<cache vary-by=”@Model”>
The Cache Tag Helper Date and Time: <b>@DateTime.Now</b>
</cache>
priority:
It helps to provide guidance to the cache provider. High, Low, NeverRemove, Normal are the list of priority attributes. The time of the cache memory problem, the cache provider will remove the low priority cache. The priority attribute is only a suggestion. If the priority attribute value is ‘NeverRemove’ it doesn’t mean it will never expire or be removed.
<cache priority=”High”>
The Cache Tag Helper Date and Time: <b>@DateTime.Now</b>
</cache>
This article explains what a cache tag helper is, how it works, and what different attributes it contains.
If you have any questions, please leave a comment below.


