Categories
Technology

Ruby on Rails App Development Trends 2023

Ruby on Rails is becoming a more mature technology, since its initial release, having been updated with some improvements like better performance and increased scalability.

Ruby on Rails will continue to evolve and improve in 2023, with new updates and features that are being released to make web development faster and more efficient

Let’s have a look at some Ruby on Rails trends to watch out for in 2023:

1. Growth in popularity

Ruby on Rails has been a very popular web development framework for many years, and this trend is expected to continue in 2023 as well. Its simple framework is what makes developers of all skill levels love it.

2. Stability

Newer versions of Ruby on Rails work better with published gems and third party integrations, so it is less likely to break at inopportune moments. Additionally, improvements are also made to the core making the framework is more stable overall.

3. Increased performance and scalability

As web applications become more complex and handle more data, Ro is more focused on support for better performance and scalability lately.

4. Flexibility

The tech world is full of companies where Ruby on Rails shines. Ruby on Rails is flexible and can be used in developing applications for many different types of companies

5. Better speed

Ruby on Rails is now 3x faster than older versions, as well as the memory usage issues are solved. With each new version efficiencies are discovered and are created helping the framework run faster in given circumstances. Any speed increase is a benefit to the end users.

6. Security

Newer versions of Ruby on Rails have all the known security issues patched and benefit from full support for any new vulnerability discovered. Ruby on Rails supports security features to combat the increase in cyber-attacks, as the importance of secure web applications cannot be overemphasized. 

7. Integration with other technologies

Ruby on Rails is getting more integration with other technologies like cloud services, AI and blockchain, enabling developers to create more advanced and sophisticated web applications.

8. Optimized and responsive

The current Ruby on Rails versions are more performant, better optimized and responsive.

Even though Ruby on Rails isn’t a new framework, it remains popular among developers and a software organization because of its dependable and strong technology. Ruby and Rails has an exciting year ahead with these new features, improved performance and reliability. Developers can easily stay up-to-date with these trends in Ruby on Rails and if you are a business owner, Ruby on Rails is constantly evolving and improving to help your business app. If you are a startup business, then you can climb onto firm ground quickly, and since timing for startups is a key success factor, Ruby on Rails is an ideal technology. And you can look forward to taking advantage of these technology trends in the future.

Are you looking tо buіld a арр fоr уоur buѕіnеѕѕ? Techcedence’s experts are ready to help you build an app with Ruby on Rails. Get in touch with us now!

Categories
Technology

Blazor Performance Optimization: Lazy Loading Guide

Blazor is a powerful framework for building interactive web applications using .NET. As applications grow in size and complexity, performance optimization becomes crucial. One effective technique to enhance performance is lazy loading. In this blog post, we will explore lazy loading in Blazor and understand how it can improve the loading speed and responsiveness of your applications.

What is Lazy Loading? 

Lazy loading is a technique that defers the loading of certain resources or components until they are actually needed. Instead of loading everything upfront, lazy loading allows you to load specific parts of your application on-demand, reducing the initial load time and improving overall performance.

Benefits of Lazy Loading in Blazor

  1. Faster Initial Load: By loading only the essential components and resources during the initial page load, lazy loading minimizes the amount of data transferred, resulting in faster load times.
  2. Reduced Bandwidth Usage: Lazy loading helps conserve bandwidth by fetching additional components or data only when they are required. This is particularly beneficial for mobile users or those on slower network connections.
  3. Improved User Experience: With lazy loading, users can start interacting with the application sooner, as they don’t have to wait for the entire application to load. This improves the perceived performance and provides a more responsive user experience.

Implementing Lazy Loading in Blazor

To implement lazy loading in Blazor, we can leverage the dynamic component loading feature introduced in Blazor .NET 6.

  1. Identify the Components to Lazy Load: Analyze your application and identify components that are not immediately necessary on the initial page load. Examples may include complex data grids, charts, or sections of the application that are accessed less frequently.
  2. Create Placeholder Components: For the components that will be lazily loaded, create lightweight placeholder components that are initially rendered in their place. These placeholders can be simple loading spinners or placeholders with minimal content.
  3. Load Components On-Demand: When the user triggers an action or navigates to a section requiring a lazily loaded component, dynamically load the actual component and replace the placeholder. This can be done using mechanisms like RenderFragment or by utilizing third-party libraries such as Blazor.Lazy.
  4. Manage State and Data Dependencies: Consider any state or data dependencies of the lazily loaded components. Ensure that the necessary data is available and propagated to the components when they are loaded.
  5. Graceful Error Handling: Handle any errors that may occur during the lazy loading process, such as network failures or component loading failures. Provide informative error messages or fallback options to prevent a poor user experience.

Sample Lazy loading

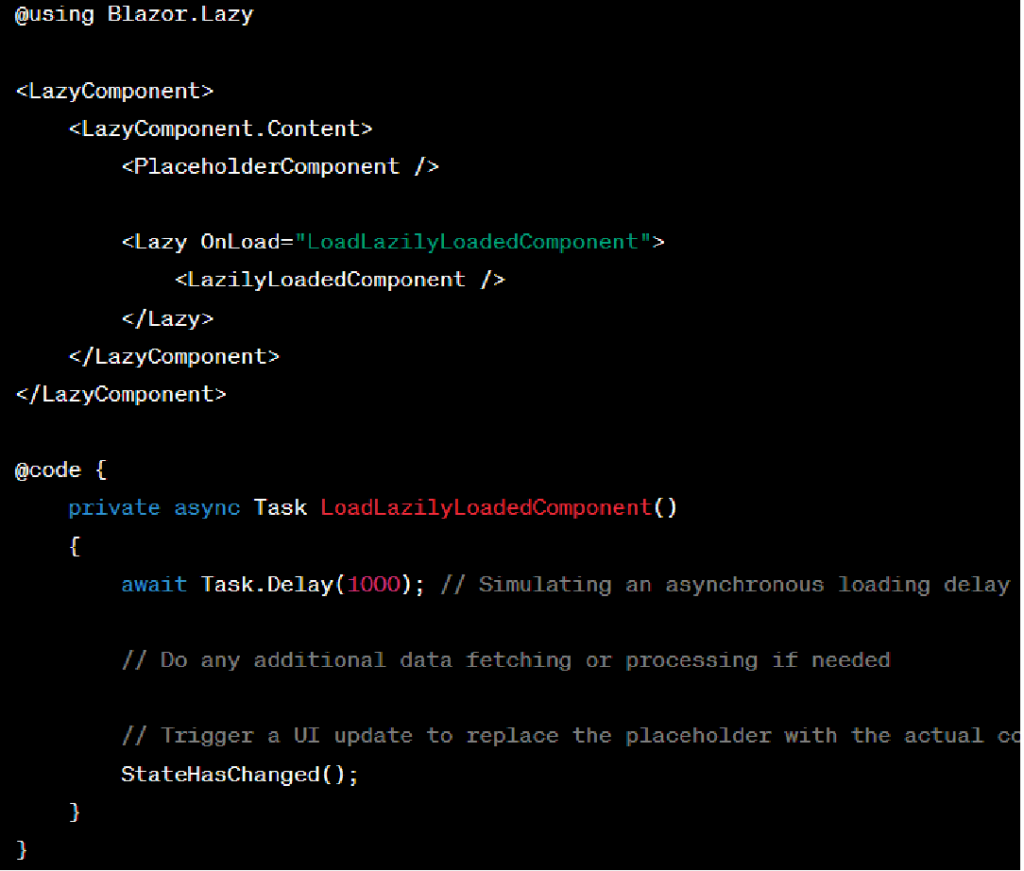
Here are a few code snippets to illustrate the implementation of lazy loading in Blazor

1. Placeholder Component 

lazy loading in Blazor example 1

2. Lazily Loaded Component

lazy loading in Blazor example 2

3. Lazy Loading in Parent Component: 

lazy loading in Blazor example 3

In the example above, the PlaceholderComponent serves as a lightweight component initially rendered in place of the LazilyLoadedComponent. The LazyComponent from the Blazor.Lazy library is used to encapsulate the lazy loading functionality. When the LoadLazilyLoadedComponent method is invoked, it simulates an asynchronous loading delay and then replaces the placeholder with the actual LazilyLoadedComponent.

Remember to include the necessary using statements and reference any required libraries in your Blazor project to utilize lazy loading functionality.

These code snippets provide a basic implementation of lazy loading in Blazor. You can further enhance and customize the implementation based on your specific requirements and application structure.

The code snippet provided uses the Blazor.Lazy library as an example. Make sure to install the library via NuGet or use an alternative lazy loading solution if desired 

Conclusion: 

Lazy loading is a powerful technique in Blazor to optimize performance by deferring the loading of non-critical components and resources until they are needed. By reducing the initial load time and conserving bandwidth, lazy loading can significantly enhance the user experience of your Blazor applications. Remember to identify the right components to lazy load, create placeholders, and load components on-demand while considering state management and error handling.

By adopting lazy loading techniques in your Blazor applications, you can deliver fast, responsive, and highly performant web experiences. So, why wait? Start leveraging lazy loading in Blazor today and take your application performance to the next level!

Additionally, if you want to explore more about the topic, you can check out the informative blog post titled “Creating Static Images in Blazor: A Complete Guide” for further insights and guidance.

Categories
Technology

Creating Static Images in Blazor: A Complete Guide

Blazor is a popular web framework that allows developers to create web applications using C# instead of JavaScript. It provides a simple, elegant, and efficient way to build client-side applications that run in any modern web browser. In this article, we will be exploring the creation of static images in Blazor. We will cover the basics of how to add and display images in a Blazor application, as well as some advanced techniques for optimizing images for better performance.

Understanding Image Formats

Before we dive into the specifics of creating static images in Blazor, it is important to understand the different image formats available and their respective advantages and disadvantages. There are three primary image formats used on the web: JPEG, PNG, and GIF.

JPEG is a lossy image format that is best suited for photographs and other complex images with many colors. It is a compressed image format that reduces file size by removing some of the image’s original data. While this compression can result in a loss of image quality, it can also greatly reduce file size, making it ideal for use on the web.

PNG is a lossless image format that is best suited for images with fewer colors, such as logos, icons, and other graphics. Unlike JPEG, PNG compression does not remove any image data, resulting in higher image quality but larger file sizes.

GIF is a lossless image format that supports animation. It is best suited for simple animations and other small, lightweight graphics.

Adding Images to a Blazor Application

Adding images to a Blazor application is a straightforward process. First, you need to include the image file in your project’s wwwroot folder. This folder is used to store static files that can be served directly by the web server.

Once you have added the image file to your project, you can reference it in your HTML or Razor code using the  tag. For example, the following code displays an image named “logo.png” in a Blazor component:

<img src=”/logo.png” alt=”My Logo” />

In this code, the “src” attribute specifies the location of the image file, and the “alt” attribute provides alternative text that is displayed if the image cannot be loaded or is inaccessible to visually impaired users.

Optimizing Images for Better Performance

While adding images to a Blazor application is easy, it is important to optimize them for better performance. Large, unoptimized images can slow down the loading time of your web pages and negatively impact the user experience. There are several techniques that you can use to optimize images in a Blazor application:

Reduce Image Size: One of the simplest ways to optimize images is to reduce their size. This can be done by compressing the image using a tool like TinyPNG or by resizing the image to a smaller resolution. This reduces the file size of the image, making it faster to load.

Use Responsive Images: Responsive images are images that are served in different sizes depending on the screen size of the device. This ensures that the image is always displayed at the appropriate size and resolution, improving the user experience.

Lazy Loading: Lazy loading is a technique that defers the loading of non-critical resources, such as images, until they are needed. This can greatly reduce the initial load time of your web pages and improve performance.

Conclusion

In conclusion, creating static images in Blazor is a simple process that involves adding the image file to your project’s wwwroot folder and referencing it in your HTML or Razor code using the tag. However, it is important to optimize your images for better performance by reducing their size, using responsive images, and lazy loading.

Additionally, if you want to explore more about the topic, you can check out the informative blog post titled “The Ultimate Guide to Blazor Forms and Validation” for further insights and guidance.

Categories
Mobile App Development

Future of iOS App Development: 2023 Trends & Predictions

In the world of mobile app development, iOS remains one of the most popular platforms. With the release of iOS 15, Apple has added new features and capabilities that will shape the future of iOS app development. In this blog, we will explore some of the trends and predictions for iOS app development in 2023.

1. The Rise of Augmented Reality (AR) and Virtual Reality (VR) Apps

Augmented reality and virtual reality technologies have been gaining momentum over the past few years, and this trend is expected to continue. Apple has been heavily investing in AR and VR technologies, and with the release of ARKit and RealityKit, developers can create immersive AR and VR experiences within their iOS apps. In 2023, we can expect to see more iOS apps that integrate AR and VR to create engaging user experiences.

2. Increased Use of Artificial Intelligence (AI) and Machine Learning (ML)

AI and ML are becoming increasingly important in the development of mobile apps, and this trend is expected to continue. Apple has integrated Core ML, a machine learning framework, into iOS, allowing developers to build intelligent apps that can learn and improve over time. In 2023, we can expect to see more iOS apps that leverage AI and ML to provide personalized user experiences.

3. More Emphasis on App Security and Privacy

With the increasing number of security breaches and privacy violations, app developers are becoming more conscious about the security and privacy of their apps. In 2023, we can expect to see more iOS apps that prioritize security and privacy, including features such as two-factor authentication, encryption, and data protection.

4. Expansion of Wearable Technology

Apple’s wearable technology, such as the Apple Watch, has become increasingly popular over the years. In 2023, we can expect to see more iOS apps that integrate with wearable technology, allowing users to access app features directly from their wrist. This will provide users with more convenience and flexibility in how they interact with their favourite iOS apps.

5. Increased Adoption of Swift Programming Language

Swift has become the preferred programming language for iOS app development. With its ease of use and powerful features, swift app development has helped developers to build high-quality apps quickly and efficiently. In 2023, we can expect to see more iphone application development company’s adapt to and iOS apps developed using Swift, as developers continue to appreciate its simplicity and effectiveness.

Conclusion

In conclusion, the future of iOS app development is exciting, with new technologies and trends shaping the landscape. AR and VR, AI and ML, app security and privacy, wearable technology, and the continued adoption of Swift programming language are all trends that will shape iOS app development and its related trends and predictions for 2023. As a mobile app development company, we at Techcedence moving forward, can expect to see even more innovative and engaging iOS apps that provide users with personalized and immersive experiences. For more details, go to – sales@techcedence.com 

Categories
Solutions

9 common mistakes to avoid when implementing an inventory tracking system?

Inventory tracking systems can be a lifesaver for businesses that need to manage their stock efficiently. However, implementing such a system can be challenging, and there are several common mistakes that businesses make that can lead to inaccurate data, increased costs, and decreased efficiency. In this blog post, we will explore nine common mistakes to avoid when implementing an inventory tracking system.

1. Failing to define inventory goals

One of the most common mistakes businesses make when implementing an inventory tracking system is failing to define their inventory goals. Before implementing an inventory tracking system, it’s essential to have a clear understanding of what you want to achieve. This includes defining your inventory levels, lead times, and order frequency.

2. Choosing the wrong software

Choosing the wrong inventory tracking software can lead to a host of problems, including inaccurate data and decreased efficiency. When selecting an inventory tracking system, it’s essential to consider your specific business needs, such as the number of products you sell, the size of your inventory, and the number of locations you have.

3. Failing to train employees

Another common mistake businesses make when implementing an inventory tracking system is failing to train their employees properly. It’s essential to train your employees on how to use the software and the importance of accurate data entry. This will help ensure that everyone is on the same page and that the system is used correctly.

4. Neglecting to reconcile inventory

Reconciling your inventory is an essential part of any inventory tracking system. Neglecting to reconcile your inventory can lead to inaccurate data and decreased efficiency. Make sure to reconcile your inventory regularly to ensure that the data in your system is up to date and accurate.

5. Not conducting regular audits

Regular audits are another critical part of any inventory tracking system. Audits help ensure that the data in your system is accurate and that you’re not missing any inventory. Make sure to conduct regular audits to catch any discrepancies and correct them quickly.

6. Overlooking barcode scanning

Barcode scanning is an essential tool for any inventory tracking system. Overlooking barcode scanning can lead to inaccurate data and decreased efficiency. Make sure to use barcode scanning to track your inventory accurately.

7. Ignoring data analytics

Data analytics is another critical component of any inventory tracking system. Ignoring data analytics can lead to missed opportunities for improvement and decreased efficiency. Make sure to analyze your data regularly to identify trends and areas for improvement.

8. Failing to integrate with other systems

Integrating your inventory tracking system with other systems, such as your point of sale system, can lead to increased efficiency and accuracy. Failing to integrate with other systems can lead to inaccurate data and increased costs. Make sure to integrate your inventory tracking system with other systems when possible.

9. Not prioritizing data security

Data security is a critical consideration when implementing any system that involves sensitive data. Not prioritizing data security can lead to data breaches and other security issues. Make sure to prioritize data security when implementing your inventory tracking system.

Conclusion

In conclusion, implementing an inventory tracking system can be a game-changer for businesses looking to manage their stock efficiently. However, it’s essential to avoid common mistakes such as failing to define inventory goals, choosing the wrong software, failing to train employees, neglecting to reconcile inventory, not conducting regular audits, overlooking barcode scanning, ignoring data analytics, failing to integrate with other systems, and not prioritizing data security. By avoiding these mistakes, businesses can ensure that their inventory tracking system is accurate, efficient, and secure. For more information about inventory tracking system, write to sales@techcedence.com

Categories
Technology

Vue vs React vs Angular: Which is the Best Choice for your Project?

If you’re planning to develop a web application, you might have heard about Vue, React, and Angular. These three are the most popular and widely used frontend frameworks among web developers. Each of these frameworks has its own advantages and disadvantages, and choosing the right one can be a daunting task. In this blog post, we’ll compare Vue, React, and Angular to help you decide which one is the best choice for your project.

Vue.js

Vue.js is a lightweight and progressive JavaScript framework used for building user interfaces. It was created by Evan You in 2014 and has gained popularity because of its simplicity and ease of use. Vue.js is a reactive framework that updates the view automatically when the data changes.

One of the significant advantages of Vue.js is its small size, which makes it an excellent choice for building small to medium-sized applications. Vue.js is also easy to learn, and you can get started with it quickly, even if you’re a beginner. Vue.js has a comprehensive documentation and an active community that provides support and assistance to developers.

Another advantage of Vue.js is its flexibility. You can integrate Vue.js with other libraries and frameworks like React or Angular, which makes it an excellent choice for developing hybrid applications. Vue.js also supports server-side rendering, which improves the performance of web applications.

React

React is a popular JavaScript library for building user interfaces. It was created by Facebook in 2011 and is widely used by large companies like Netflix, Airbnb, and Instagram. React uses a virtual DOM, which improves the performance of web applications by reducing the number of DOM manipulations.

One of the significant advantages of React is its performance. React uses a virtual DOM, which makes it faster than other frameworks like Angular. React also has a large community that provides support and assistance to developers.

React is also flexible and can be used with other libraries and frameworks. You can use React with Vue.js or Angular to develop hybrid applications. React also has a vast ecosystem of third-party libraries and tools that make it easy to develop complex web applications.

Angular

Angular is a popular JavaScript framework for building web applications. It was created by Google in 2010 and is widely used by large companies like Microsoft, IBM, and PayPal. Angular is a full-featured framework that provides everything you need to develop complex web applications.

One of the significant advantages of Angular is its robustness. Angular provides a complete solution for building web applications, including data binding, forms, and routing. Angular also has a large community that provides support and assistance to developers.

Angular also has excellent performance. Angular uses a virtual DOM, which makes it faster than other frameworks like Vue.js. Angular also provides server-side rendering, which improves the performance of web applications.

Vue vs React vs Angular

Now that we’ve looked at the advantages of each framework, let’s compare them to help you decide which one is the best choice for your project.

Learning Curve

When it comes to the learning curve, Vue.js is the easiest to learn. Vue.js has a small API and is straightforward to understand, even if you’re a beginner. React and Angular, on the other hand, have a steeper learning curve. React uses JSX, which can be challenging to learn, and Angular has a lot of concepts that you need to understand before you can start developing web applications.

Performance

When it comes to performance, React and Angular are the clear winners. React uses a virtual DOM, which makes it faster than Vue.js. Angular also uses a virtual DOM and provides server-side rendering, which improves the performance of web applications.

Flexibility

When it comes to flexibility, Vue.js is the clear winner. Vue.js is a lightweight framework that can be easily integrated with other libraries and frameworks. React and Angular are also flexible, but they have a slightly steeper learning curve when it comes to integration with other technologies.

Robustness

When it comes to robustness, Angular is the clear winner. Angular provides a complete solution for building web applications, including data binding, forms, and routing. React and Vue.js are more focused on the view layer and require additional libraries for routing and state management.

Community and Ecosystem

All three frameworks have active communities that provide support and assistance to developers. However, React has the largest ecosystem of third-party libraries and tools. Vue.js also has a vibrant ecosystem, but it is not as large as React’s. Angular also has a large ecosystem, but it is more focused on enterprise applications.

Which one is the best choice for your project?

The answer to this question depends on the specific requirements of your project. If you’re building a small to medium-sized application and want a lightweight and easy-to-learn framework, Vue.js might be the best choice. If you’re building a large application that requires excellent performance and a large ecosystem of third-party libraries, React might be the best choice. If you’re building an enterprise-level application that requires a complete solution for building web applications, including data binding, forms, and routing, Angular might be the best choice.

Conclusion

Vue.js, React, and Angular are all excellent frontend frameworks that have their own advantages and disadvantages. The best choice for your project depends on the specific requirements of your application. Vue.js is a lightweight and easy-to-learn framework that is an excellent choice for small to medium-sized applications. React is a popular and performant framework that has a large ecosystem of third-party libraries and tools. Angular is a robust framework that provides a complete solution for building web applications, including data binding, forms, and routing. Whatever framework you choose, make sure to take the time to learn it properly and follow best practices to ensure the success of your project. For any further information, visit – https://techcedence.com/ 

Categories
Technology

The Ultimate Guide to Blazor Forms and Validation 

This blog will explain how to implement Forms and Validation in Blazor. The EditForm component aids in the validation of webforms and data annotations.

Let’s look at how the EditForm component handles data annotation validation.

Consider the Student class file below.

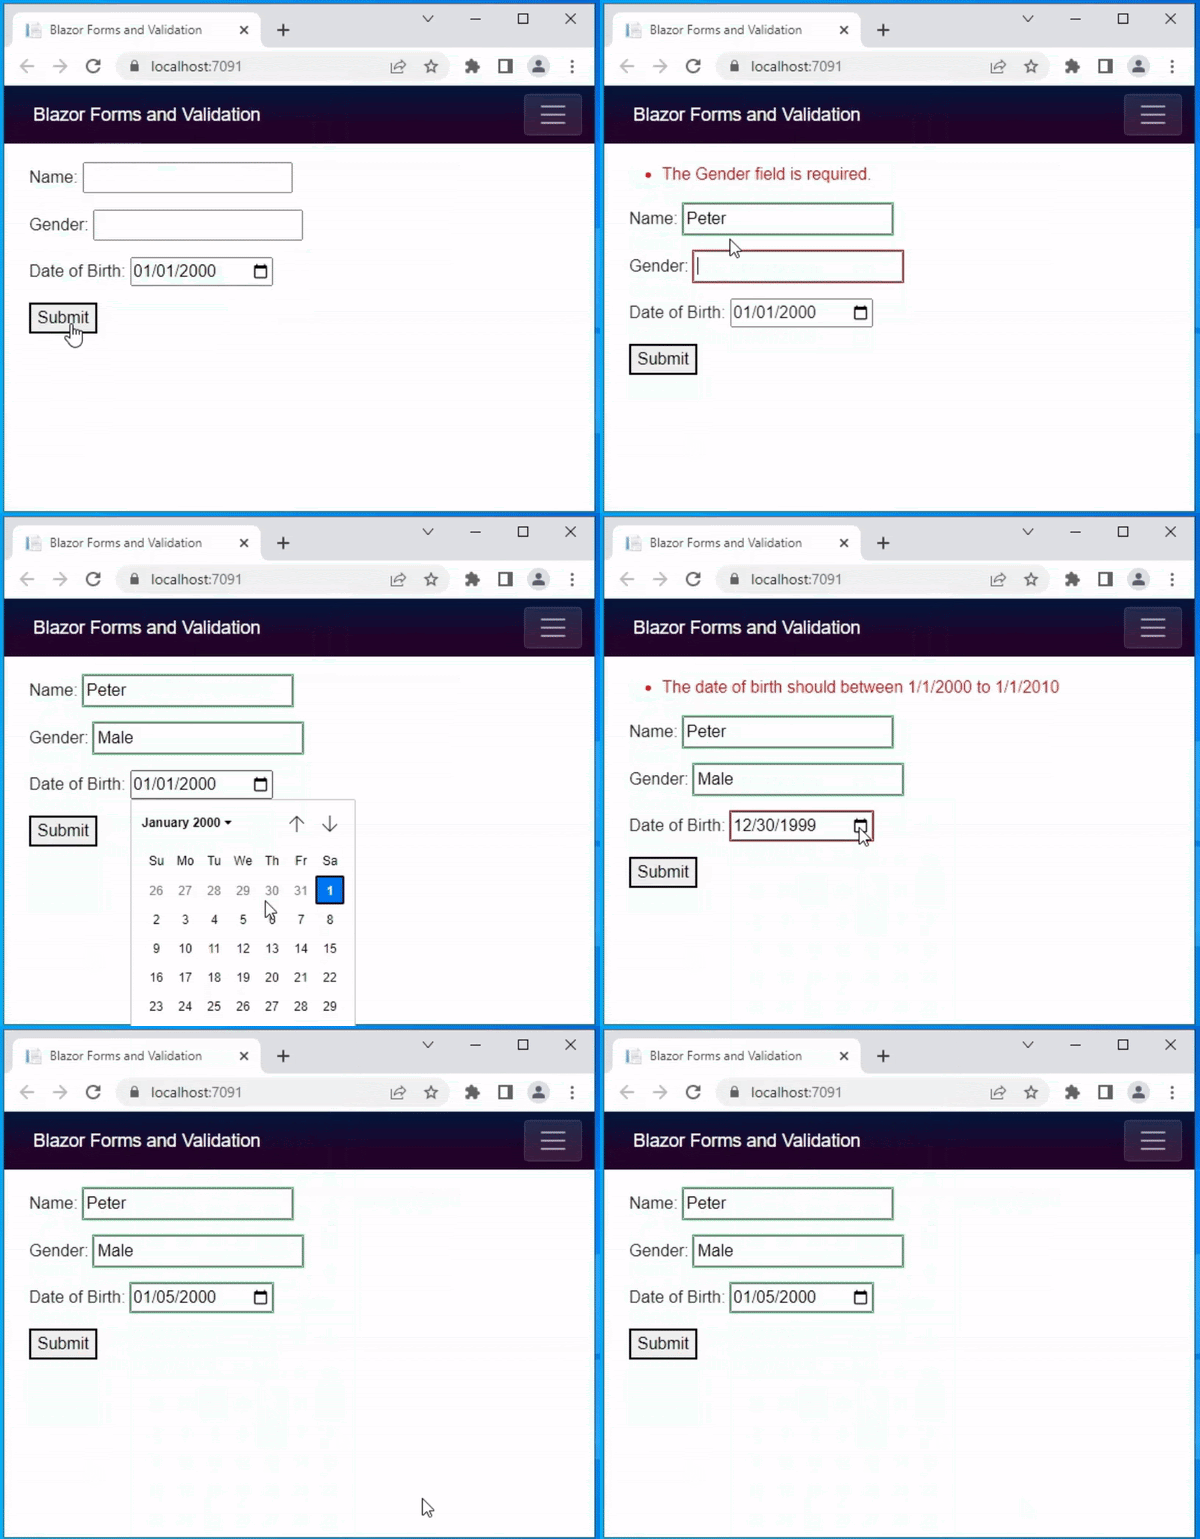
All of the class properties are marked with the [Required] attribute in this case. It specifies that the value of the data field is required. [MinLength(3)] attributes are assigned to the Name. It specifies the shortest string data allowed in name. The [Range] attribute is assigned to the DateOfBirth property. The range has been set to “1/1/2000” to “1/1/2010”. As a result, the date of birth should be between “1/1/2000” and “1/1/2010”. Also, the ErrorMessage property has been set, so if the user enters an invalid date of birth, the error message will be displayed.

Demo.cs
using System.ComponentModel.DataAnnotations;

namespace SampleBlazorApp.Data
{ 
    public class Student
    {
        [Required]
        [MinLength(3)]
        public string Name{ get; set; }
        
        [Required]
        public string Gender { get; set; }

        [Required]
        [Range(typeof(DateTime), "1/1/2000", "1/1/2010",
        ErrorMessage = "The date of birth should between 1/1/2000 to 1/1/2010")]
        public DateTime DateOfBirth { get; set; } = Convert.ToDateTime("1/1/2000");
    }
}

The code for a razor component is as follows. A form attribute is created by the EditForm element. It displays the form element. In the @code area, the student model is created. The student model is assigned the Model attribute in the EditForm component. As a result, it binds the student model to the form. The SaveData method is assigned to the EditForm‘s OnValidSubmit attribute. The SaveData  method will be executed if no validation errors occur. For example, if any of the input fields are empty, the validation summary will display the message like “The name field is required”. That means the validation process isn’t finished. The SaveData method is not called in such cases.

In the code below, an InputText component is added to add and edit string values. The InputDate component has been added to collect the date of birth value. The @bind-Value directive attribute aids in binding model values to the component value properties InputText and InputDate.

index.cshtml
@page "/"
@using SampleBlazorApp.Data

<EditForm Model="@student" OnValidSubmit="SaveData">
    <DataAnnotationsValidator />
    <ValidationSummary />

    <p>
        First Name:
        <InputText @bind-Value="@student.FirstName"></InputText>
    </p>
    <p>
        Last Name:
        <InputText @bind-Value="@student.LastName"></InputText>
    </p>

    <p>
        Gender:
        <InputText @bind-Value="@student.Gender"></InputText>
    </p>

    <p>
        Date of Birth:
        <InputDate @bind-Value="@student.DateOfBirth"></InputDate>
    </p>

    <p>
        Address:
        <InputText @bind-Value="@student.Address"></InputText>
    </p>
    <button type="submit">Submit</button>
</EditForm>

@code {
    private Student student = new Student();

    private void SaveData()
    {
        // data save code
    }
}

The following is the output of the above code. Here you can see that when the user clicks on the submit button it gives a summary error message. The error message disappears when the user enters the correct values.

blazor validation 1

Must True Validation

The user may be required to acknowledge something like ‘I accept the terms and conditions’ at times. If this is the case, the checkbox must be selected before submitting the form.  Let’s look at how to do that with data annotation validation.

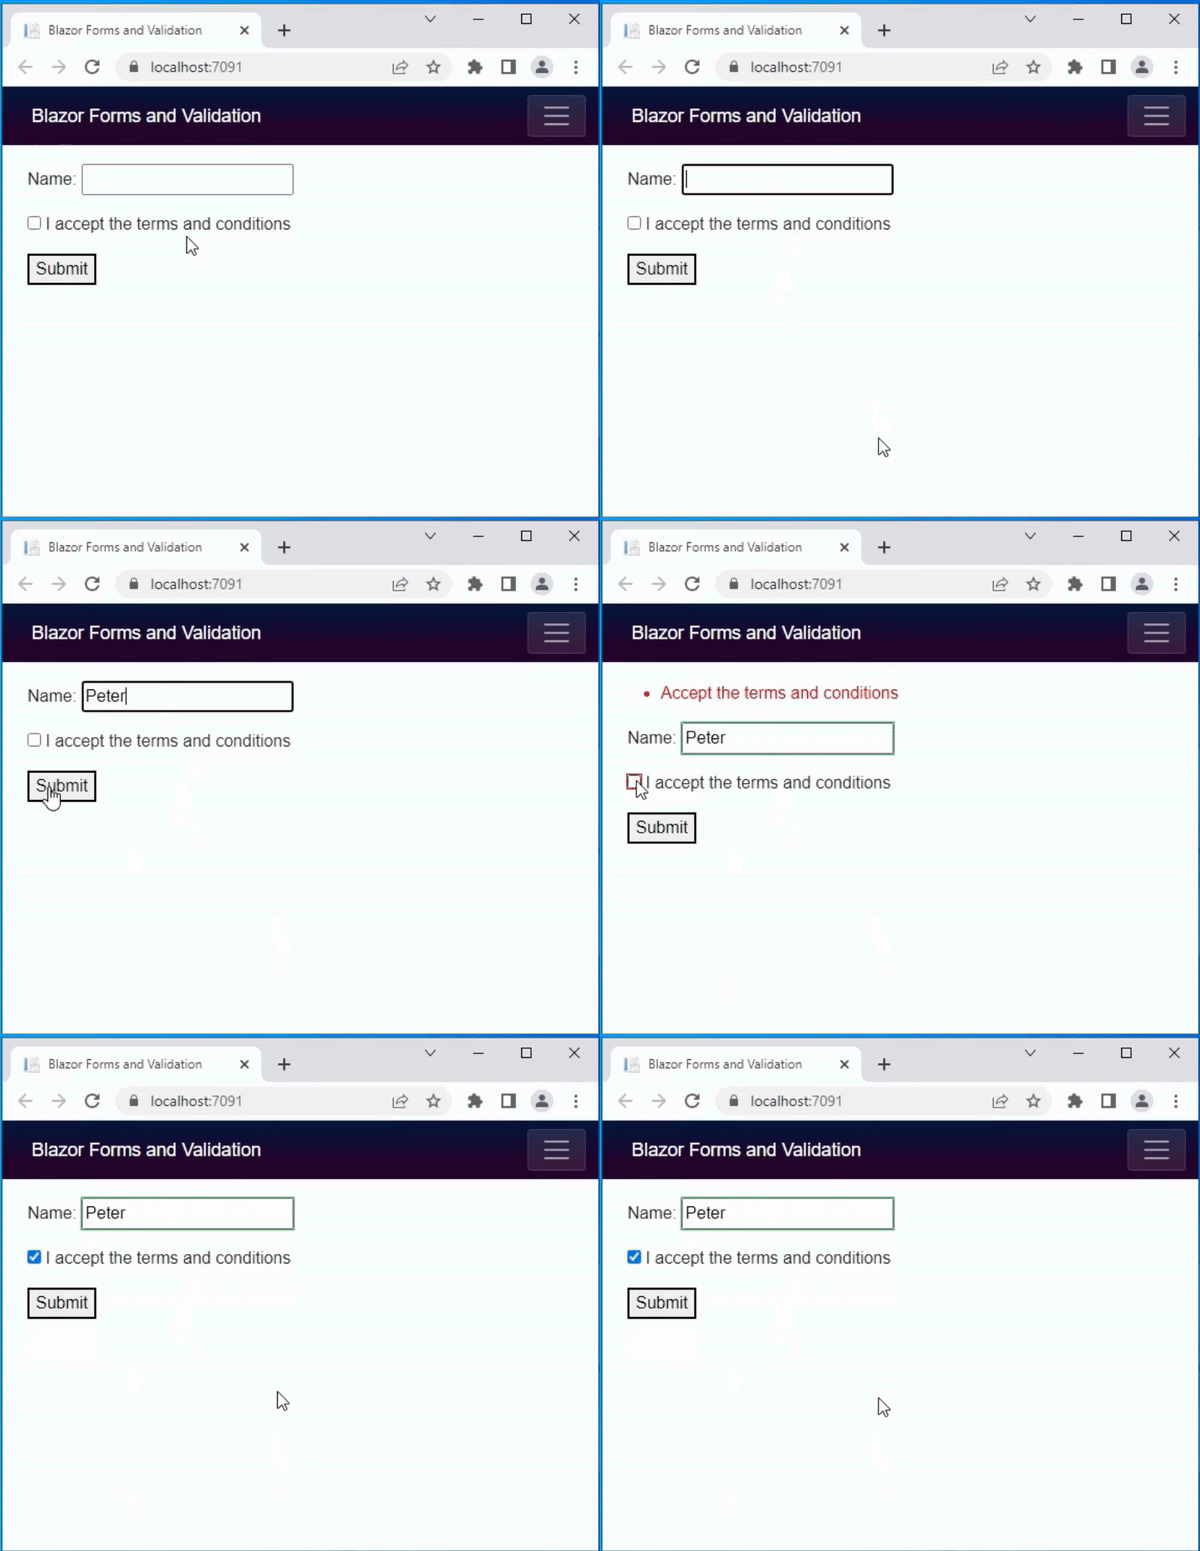
A demo class file is provided below. It has two properties: Name and IsAccepted. The property IsAccepted must be true. So, the range validation attribute was used here. The data type bool has been specified. The minimum and maximum values are both set to “true.” If it is false, it means the user did not check the checkbox, and the error message will be displayed.

Demo.cs

using System.ComponentModel.DataAnnotations;

namespace SampleBlazorApp.Data

{
    public class Demo
    {
        [Required]
        [MinLength(2)]
        public string Name { get; set; }

        [Range(typeof(bool), "true", "true", 
            ErrorMessage = "Accept the terms and conditions")]            
        public bool IsAccepted { get; set; }
    }
}

The following is a razor page code. 

index.razor
@page "/"
@using SampleBlazorApp.Data

<EditForm Model="@demo" OnValidSubmit="SaveData">
    <DataAnnotationsValidator />
    <ValidationSummary />

    <p>
        Name:
        <InputText @bind-Value="@demo.Name"></InputText>
    </p>
    <p>
        <InputCheckbox @bind-Value="@demo.IsAccepted"></InputCheckbox> I accept the terms and conditions
    </p>

    <button type="submit">Submit</button>
</EditForm>

@code {
    private Demo demo = new Demo();

    private void SaveData()
    {
        // data save code
    }
}

The image below is the result of the above code. The range validation is demonstrated here.

blazor validation 2

Validation for Specific Field

The preceding examples demonstrate how to display the error message in summary. However, if you want to display a specific error message, you can use the <ValidationMessage> component. The code below demonstrates the specific field validation. The <ValidationMessage> attribute has been added next to the Name and Age textboxes.

index.cshtml
@page "/"
@using SampleBlazorApp.Data

<EditForm Model="@demo" OnValidSubmit="SaveData">
    <DataAnnotationsValidator />

    <p>
        Name:
        <InputText @bind-Value="@demo.Name"></InputText>
        <ValidationMessage For="@(() => demo.Name)" />
    </p>
    <p>
        Age: 
        <InputNumber @bind-Value="@demo.Age" ></InputNumber>
        <ValidationMessage For="@(() => demo.Age)" />
    </p>

    <button type="submit">Submit</button>
</EditForm>

@code {
    private Demo demo = new Demo();

    private void SaveData()
    {
        // data save code
    }
}

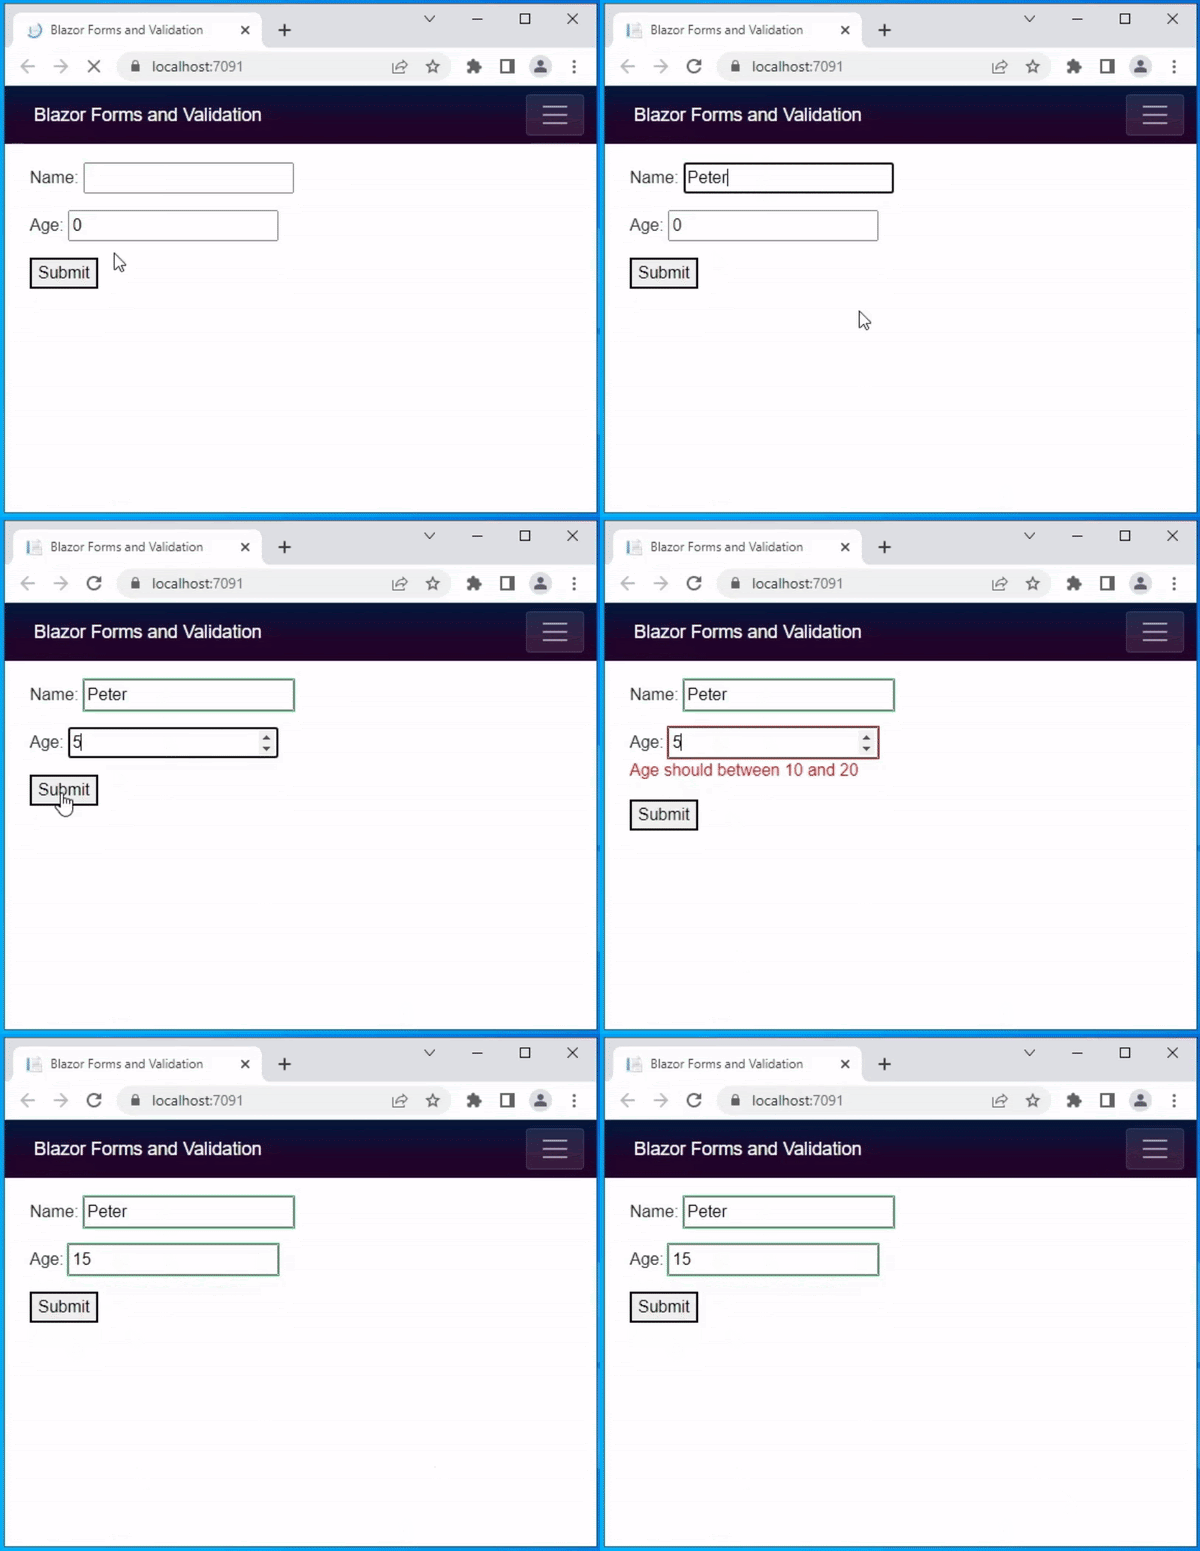
The above code produced the following result. When the user enters the age 5 here, the error message appears right next to the age textbox.

blazor validation 3

Handle Form Submission

To handle the form submission, the EditForm provide following callbacks

OnValidSubmit – This will call the assigned event handler when the user has entered all valid entries

OnInvalidSubmit – This will call the assigned event handler when the input value is no or any value is invalid

OnSubmit – This will call the assigned event handler whether the form is valid or not.

Built-in form component

The Blazer framework provides some built-in input components to obtain input values. The following is a list of built-in form elements

Input ComponentRendered Element
InputCheckbox<input type=”checkbox”>
InputDate<input type=”date”>
InputFile<input type=”file”>
InputNumber<input type=”number”>
InputRadio<input type=”radio”>
InputRadioGroupGroup of child InputRadio
InputSelect<select>
InputText<input>
InputTextArea<textarea>

Conclusion

From this blog you can understand how form and data annotation validation works in Blazor. Also, You can also find coding examples for various types of validation. I hope you find this blog useful.

Read our blog for valuable insights on Static Image in Blazor

Categories
Technology

Why DevSecOps is the Need of the Hour?

DevOps blurs the lines between development and operations. It blends both these aspects to help companies deliver software applications better and quicker. In 2021, over 80 percent of IT decision-makers implemented DevOps to tap a higher business value!

But like every other technology and approach, DevOps also has its story of evolution to tell. DevSecOps, the evolved form of DevOps, is precisely what we are referring to here.

Earlier, usually, development used to be almost every company’s prime focus. Security was often an afterthought. But ever-evolving and rising security concerns encouraged DevOps to evolve into DevSecOps, a much better approach to software development. Experts look at DevSecOps as the need of the hour. Let’s examine a few reasons.

What is DevSecOps?

DevSecOps is development, security, and operations. It is an approach that introduces security earlier in the software development lifecycle (SDLC). In addition, it broadens the collaboration between the development and operations teams to integrate security teams in the software development lifecycle. 

DevSecOps demands a change in the process, tools, and culture across the cure verticals and makes security a shared onus. Thus, every element of the SDLC plays a role in building security in the DevOps CI/CD workflow.

While this is understood and signifies the importance of DevSecOps in the current context, let’s delve into a few reasons that make DevSecOps the need of the hour.

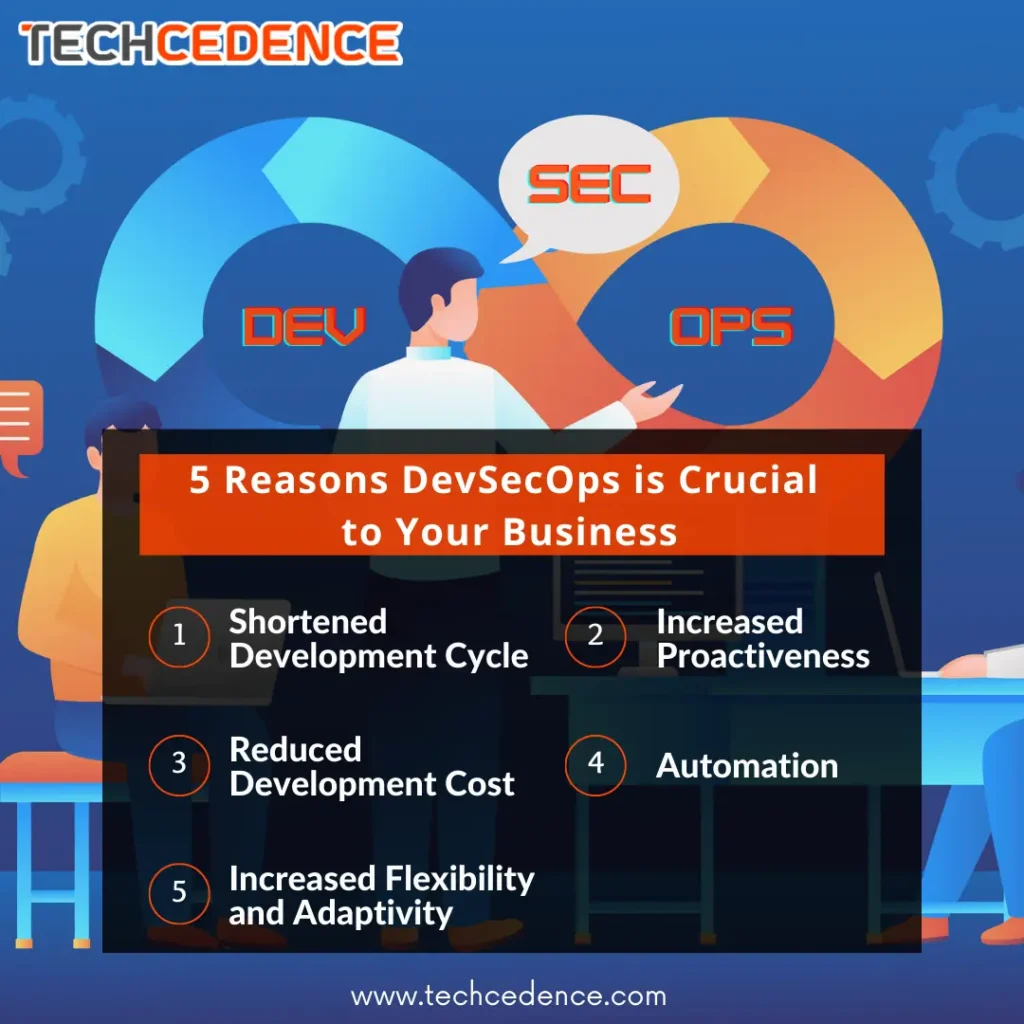
5 Reasons DevSecOps is Crucial to Your Business

Reasons DevSecOps is Crucial to Your Business

Fundamentally, DevSecOps introduces the security aspect from the initial stages of the software development process. But in addition to it, it has various other benefits that make this approach significant. Let’s assess those facets.

1. Shortened Development Cycle

The conventional software development approach involves development, operations, and security teams working separately. Every team in the sequence has to wait for the previous team to finish its task and start its job.

Working with such an approach could delay product development and release. Besides, defects in the product take it back into the cycle, thus requiring even more time, effort, and cost to develop and release. Let alone the product’s quality that suffers!

But DevSecOps integrates all these teams that work collaboratively and simultaneously. It helps cut short the development cycle, as the product is developed, tested, and rectified at the same time. The result is a better, quicker, and more secure product.

2. Increased Proactiveness

DevSecOps refers to a proactive approach, as it has all three core teams working collaboratively and simultaneously. So, while the development team continues developing, the testing unit ensures frequent testing and detection of security vulnerabilities while the development is in progress. Rectification happens immediately after the fault is detected. Nothing is kept to deal with it at a later stage, especially security, dealing with the gaps which would later become herculean!

3. Reduced Development Cost

Imagine discovering a critical security defect (which initially went unnoticed or left unattended) after the product’s launch! Rectifying it could double the development cost, especially if it requires significant architectural changes. 

But DevSecOps takes care of all these aspects from the initial stages. While it takes an expert to integrate this approach, it is way more prudent investing in experts rather than resources you might have to employ later to cover things up. In a nutshell, DevSecOps reduces the overall development cost.

4. Increased Flexibility and Adaptivity

DevSecOps embeds security into the design and development process. Hence, while ensuring enhanced and stronger security, this fundamental approach allows for better flexibility in handling sudden changes. It is also because DevOps involves rolling out the development process in smaller chunks, to which continuous testing is integral. Thus, the team can make changes without reinventing the wheel.

5. Automation

DevSecOps can help companies automate various security protocols, thus increasing the efficiency and operational pace of the project’s security team. Thus, they can focus on more strategically and technically more complicated tasks. 

Integrate DevSecOps seamlessly with Techcedence. Our software development expertise and the ability to drive results via contemporary approaches can help you leverage the benefits of DevSecOps and develop better software products. 

Our team of consultants, developers, testers, and project specialists collaborate to comprehend your needs and use the DevSecOps approach to achieve high speed, quality, security, flexibility, and adaptability levels. Connect with us at sales@techcedence.com to interact with our experts.

Categories
Technology

Cross-Origin Resource Sharing (CORS)

Cross-origin resource sharing (CORS) is a mechanism based on HTTP headers that permits restricted access to a resource with a different domain.

The browser restricts the web page of different origin, this mechanism is called same origin policy. For example, https://www.demo.com/abc.html and https://www.demo.com/xyz.html these two urls are of the same origin. Consider the following urls:

  • http://www.demo.com – Different scheme: In this URL you can see that the protocol is ‘http://’ not ‘https://’. The ‘s’ (secure) is missing. 
  • https://www.demo.com:1234/abc.html – Different port number. The port number is a communication endpoint. In this URL the port no is 1234.

These kinds of different origins are blocked by browser security.

But sometimes the web page has to request some of the resources from different origins. In such cases you can use the Cross Origin Resource Sharing (CORS) as it allows the server to relax the same origin policy. 

Same Origin Policy

The same origin policy will restrict the website interacting with the resource from different domains.It helps prevent personal data from being stolen from one website to another.

How CORS Works

To make CORS Work you will have to add the new HTTP header that describes which origins allow you to read the information. To enable the CORS on the server, you have to add an additional header (Access-Control-Allow-Origin) to whitelist the urls. 

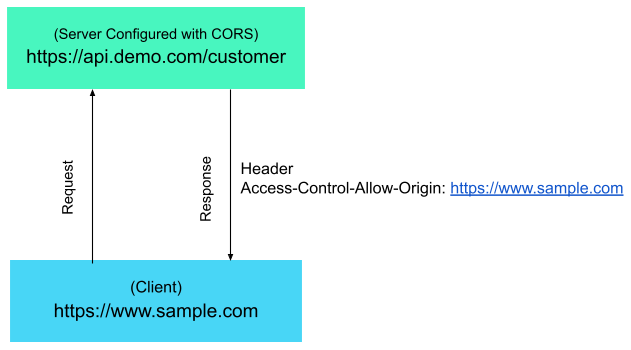
For example, if your API server is hosted in https://api.demo.com/customer and the CORS is configured in it, when you access the API from https://www.sample.com webpage it will send a response with the following header:

Access-Control-Allow-Origin: https://www.sample.com

The following image illustrates how CORS works. The client sends the request to the server API and the server API sends back the response with the header Access-Control-Allow-Origin: https://www.sample.com

Cross-Origin Resource Sharing

Also, you can use wildcard character(*), which means that the resource can be accessed by any origin.

Access-Control-Allow-Origin: *

Preflight Request

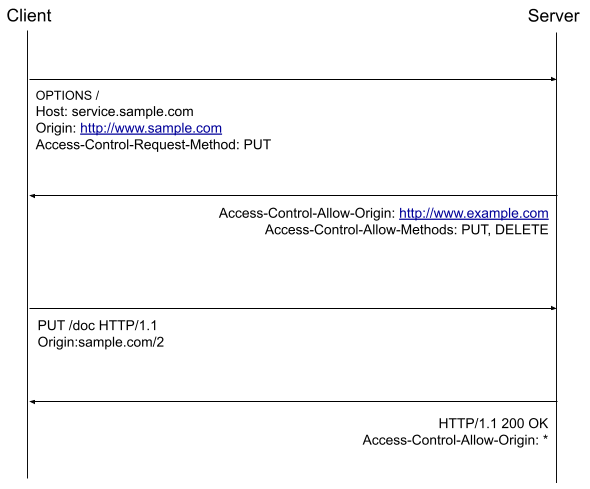
The preflight request is a small request sent by  the browser before the original request.  This will give the server an idea about the actual request.The server will then announce whether or not to send a request to the browser. The preflight request contains metadata about the HTTP method and additional request header. The server inspects the metadata and decides whether or not to send the request.

CORS

Note:

If the CORS policy is not properly configured, then it  leads to cross-domain based attacks.

Categories
Web App Development

How to choose a technology stack for web application development?

Choosing the technology stack is the first step for successful web application development. Organizations should spend time and effort in selecting the right technology stack for building a web application. 

A technology stack is a combination of tools, programming languages and frameworks used by developers to build an application. In short, it is a collection of software used for web development.

Web application development involves front end development and back-end development. The front end is where the user interacts with the application and back-end refers to the server-side of the application that communicates user requests to the server.

Technologies for front-end Web application development include:

Front end development involves three primary coding languages that can be used to build a basic web application.

  • HTML – Hypertext Markup Language used for describing the structure of displayed content
  • CSS – Cascading Style Sheet used to describe the style of content.
  • Javascript – used to make web application dynamic and interactive through animations, forms and visuals.

In addition to these, there are some open-source Javascript frameworks that are taking over the front end development which includes React JS, Angular JS, Vue JS, and jQuery.

React JS is the most trending technology for front end development. React JS is a flexible Javascript library as it enables faster UI development using reusable components. It can be integrated with external libraries like jQuery.

Angular JS is the preferred framework for creating interactive and dynamic web applications. It supports MVC programming structure and two-way data binding which makes it unique.

Vue.js is a progressive Javascript framework for building web interfaces and one-page applications. It is easily adaptable and helps to build robust and reliable applications.

jQuery is a feature-rich Javascript library. It has a collection of plugins and makes front end development easier with ready to use elements like a countdown timer, auto-complete functions.

Technologies for back end Web application development include:

The challenge lies in selecting the technologies for back-end development. Though it is not visible to the user, it defines the logic and allows the user to perform actions and interact with the application. The back-end is developed using server-side programming languages.

Back end technologies consist of an operating system, web server, framework, server-side programming language, and the database. Some of the popular programming languages for back-end development include Ruby, Python, PHP, Javascript, and .NET. Databases include MongoDB and MySQL. Some of the frameworks include Ruby on Rails, Flask, Django, Swift or Objective-C. The most popular web servers include Apache, Nginx, etc.

Middleware

Middleware acts as a communication interface between the front end and back-end. It performs tasks such as parsing and authentication.

Things to consider when choosing a Technology Stack

Users without a strong technical background will find it difficult in choosing the technology stack for their application. Here are some factors that will help users to select the right stack.

Project complexity – The first step in choosing the technology stack is to analyze the size and complexity of the application to be developed.  Applications can be small, mid-range or complex projects. Understanding the requirement makes it easy to choose the right technology stack.

Scalability – The selected technology stack should support application growth in the future. The application can grow in terms of the number of users or add more processes and functionality. Developers should select a flexible technology stack that supports the growth of the application.

Maintainability – The application should be easily maintainable. If the code is lengthy, it becomes complicated to process the code. So, select technologies that are easily maintainable and can be updated easily.

Cost – Some of the tools and frameworks are free and open-source while some require a license cost. Depending on the features and usability of the software, opt for technologies that will reduce the software development cost.

Team’s expertise – Team’s expertise on the tools and technologies has to be considered while deciding on the technology stack. The team must be experienced in the technologies to develop a quality application within the deadline.

Project-based – Don’t choose a technology stack used for previous projects. Each project requirement is unique and technology components that proved successful for one project may not be relevant for another.

Ability to process data – If the project deals with loads of data, the application should be designed to handle the load. Select a programming language that can balance heavy loads of data.

Development time – The selected technology stack should facilitate faster development and reduce development time. The faster an application is developed the cheaper the development cost.

Security – Cyberattack is the biggest threat to online applications. Make sure that the technology stack you are considering is not vulnerable to security threats.

Some of the commonly used tech stacks are .NET stack, LAMP (Linux, Apache, MySQL, PHP), MEAN (MongoDB, Express js, Angular js and Node js) and Ruby on Rails.

Advantages of choosing the right technology stack

Choosing the right technology stack is important for any business and offers numerous benefits:

  • The software product will be robust
  • Faster time to market
  • Less maintenance cost
  • Easy to fix bugs and enhance the product

Selecting a technology stack can be a challenge. A wrong choice of a technology stack may result in project failure.

Discuss with our experts who can help you decide on the right technology stack for your product based on your business requirements and budget.